
- Forums
- Alliance RV General
- Exterior Components - All Alliance Brands
- Doors, Hatches and Windows
- Windows
You are using an out of date browser. It may not display this or other websites correctly.
You should upgrade or use an alternative browser.
You should upgrade or use an alternative browser.
Window screen removal
- Thread starter Dwayne
- Start date
TrustiKrusti
New member
These are Cleer Vision windows and I can't find hardly any documentation on them. It is a very poor design for any sort of cleaning. I previously tried to remove a screen and inadvertently bent the top rail (bowed) of the screen, which would have let mosquitos in.
Here is what I did to fix my issue. First both the window and the screen ride in a plastic track that is integral to both the screen and the window itself. So if you don't want to destroy the track you will have to deal with both.
1. I raised the window all the way up and taped it with duct taped to the top (and other window).
2. I then raised the screen all the way up and secured it.
3. Using needlenose pliers I carefully pulled on the lower outside track at the bottom until it came free and eased it out of the aluminum track. Take care not to bend it. Being outside may be helpful to be clear of window trim and other obstacles. I also pulled a portion of the rubber out of the groove to give me a clearer view of what I was doing.
4. Pull the track down taking care not to bend it. NOTE: The lower glass window and screen will swing free. Make sure you have secured them.
5. Keep pulling until the track is free.
6. You can now do your window tinting -or- in my case straighten the top bar.
7. Re-installation is basically the reverse.
8. I lubricated the aluminum portion and the plastic track with dawn dishwashing liquid (thin coat) to make sliding the plastic track easier.
9. The outside track must go in first as it has wings (per say) to allow friction to help hold it in place.
10. Immediately after getting it started in the track, push up and carefully get the window AND screen into their tracks and continue pushing the plastic track until it is back in it's original spot pushing the bottom back in also.
Once I got it back in everything is working fine, but there are some points where things could have gone wrong.
- Bending the plastic track too much - making it useless.
- Breaking the window or damaging the screen.
Bottom line - If you have to fix something, it can be done, but you have to be very careful!!!! I do not know of any place to buy this track. I did notice there are holes in the track to allow for the window to latch onto in various positions, so if you found a replacement track you would need to modify it to match the track on the other side.
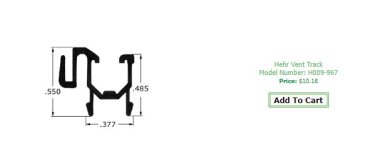
The closest I found for a replacement track is from RVwindow.com Part # H009-967. I didn't measure the track when I had it out, but this looks like a cross-section of it (see picture).
For me. The screens are getting cleaned in place and any window tinting would be done in place. Too many points for things to go wrong.
Here is what I did to fix my issue. First both the window and the screen ride in a plastic track that is integral to both the screen and the window itself. So if you don't want to destroy the track you will have to deal with both.
1. I raised the window all the way up and taped it with duct taped to the top (and other window).
2. I then raised the screen all the way up and secured it.
3. Using needlenose pliers I carefully pulled on the lower outside track at the bottom until it came free and eased it out of the aluminum track. Take care not to bend it. Being outside may be helpful to be clear of window trim and other obstacles. I also pulled a portion of the rubber out of the groove to give me a clearer view of what I was doing.
4. Pull the track down taking care not to bend it. NOTE: The lower glass window and screen will swing free. Make sure you have secured them.
5. Keep pulling until the track is free.
6. You can now do your window tinting -or- in my case straighten the top bar.
7. Re-installation is basically the reverse.
8. I lubricated the aluminum portion and the plastic track with dawn dishwashing liquid (thin coat) to make sliding the plastic track easier.
9. The outside track must go in first as it has wings (per say) to allow friction to help hold it in place.
10. Immediately after getting it started in the track, push up and carefully get the window AND screen into their tracks and continue pushing the plastic track until it is back in it's original spot pushing the bottom back in also.
Once I got it back in everything is working fine, but there are some points where things could have gone wrong.
- Bending the plastic track too much - making it useless.
- Breaking the window or damaging the screen.
Bottom line - If you have to fix something, it can be done, but you have to be very careful!!!! I do not know of any place to buy this track. I did notice there are holes in the track to allow for the window to latch onto in various positions, so if you found a replacement track you would need to modify it to match the track on the other side.
The closest I found for a replacement track is from RVwindow.com Part # H009-967. I didn't measure the track when I had it out, but this looks like a cross-section of it (see picture).
For me. The screens are getting cleaned in place and any window tinting would be done in place. Too many points for things to go wrong.
Attachments
Last edited:
Jag - resolved yet? I was having the same problem on our 310RL, wanting to tint rear window but couldn't remove screen. After finding posts showing I wasn't alone, I took another look and finally figured out the secret. If you have the same style, pull the red emergency exit tab in the middle toward you. Slide left window all the way to the right. Then screen can be slid to right and comes out easily. Just don't stand it up somewhere where you can step on it and bend it like I did. Luckily it can be straightened pretty easily. Happy tinting!Nope. I have not.