• Click here to access some of the presentations made during the 2022 National Rally

Water Filtration: Blu Tech, Clear Source, others?

M and E

Well-known member
I need a new water filter. I have a GlacierFresh but it is a total piece of garbage in my opinion and their customer service is a total joke. We've only used it a few times and it is rusting, leaking, and the quick connects failed. And despite their claims it is stainless steel, I would ask them to prove it. Anyhow, I am not sure anyone has a ton of experience with different brands of water filters but thought I'd ask a few question.

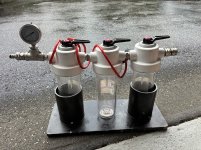
I like the size of the Blu Tech but like the flow of the Clear Source, though both are adequate.

I like the amount of filter media in the clear source but it is significantly heavier than the Blu Tech.

Both filter to less than a micron and to me that becomes a moot point, but I am not a waterborne disease expert.

Any thoughts on the above?

Would you go fixed mount or portable and why?

I saw a video (i think by an owner here) on the RV Water Filter Store three stage system and the results were not really promising. Are there any other brands you might consider?

Thanks everyone!
 

BryanValRox

Well-known member
Hi Mike,
Unfortunately, I have no experience with other brands for comparison that I can share.
We went with the Clear Source fixed mount model.
I like the idea of the fixed mount, in my mind it is one less thing to set up and take down on travel days.
It also is out of sight , so it doesn’t tempt anyone from making it their own without permission.
It is very well built, however heavy and expensive.
We are 100% pleased with it.
 

M and E

Well-known member
Hi Mike,
Unfortunately, I have no experience with other brands for comparison that I can share.
We went with the Clear Source fixed mount model.
I like the idea of the fixed mount, in my mind it is one less thing to set up and take down on travel days.
It also is out of sight , so it doesn’t tempt anyone from making it their own without permission.
It is very well built, however heavy and expensive.
We are 100% pleased with it.
Thanks Bryan. Having a fixed unit is attractive to us for the same reasons. The clear source is appealing. I posted on Facebook and an owner is using the filter media from Clear Source but a generic filter housing, for a much more economical installation. That is something I am looking into now as well.
 

Long Islander

Active member
I actually made our water filter system using three A.O. Smith 10" filter housings that were on sale at Lowes for $12 each. I used 1/2" stainless steel nipples (each 1" long) to join them together. I put quick connect fittings on each end. I also added pressure gauge on it, so I know what the water pressure is going into the trailer. It uses standard 10" x 3" filters that can be purchased at Home Depot, Lowes or Amazon. I usually use 10.0, 2.0 and 0.2 micron filters, in that order. I made a stand for it using some scraps that I has laying around the house. It cost me less $50 to put together and the filters are pretty cheap to replace. We've used for several years and find that works really well. We are always amazed how dirty the filters get.
 

M and E

Well-known member
I actually made our water filter system using three A.O. Smith 10" filter housings that were on sale at Lowes for $12 each. I used 1/2" stainless steel nipples (each 1" long) to join them together. I put quick connect fittings on each end. I also added pressure gauge on it, so I know what the water pressure is going into the trailer. It uses standard 10" x 3" filters that can be purchased at Home Depot, Lowes or Amazon. I usually use 10.0, 2.0 and 0.2 micron filters, in that order. I made a stand for it using some scraps that I has laying around the house. It cost me less $50 to put together and the filters are pretty cheap to replace. We've used for several years and find that works really well. We are always amazed how dirty the filters get.
Thanks! I just came back here to see if there were any more posts as I am searching for parts. I like projects like this. Honestly, I'd never thought about building my own until yesterday. I'm going to give it a shot. I'm curious though why you chose 1/2 inch vs. 3/4 inch filters. I've seen both but I figure I have the greatest potential for flow rate with the 3/4 inch.
 

BryanValRox

Well-known member
Thanks! I just came back here to see if there were any more posts as I am searching for parts. I like projects like this. Honestly, I'd never thought about building my own until yesterday. I'm going to give it a shot. I'm curious though why you chose 1/2 inch vs. 3/4 inch filters. I've seen both but I figure I have the greatest potential for flow rate with the 3/4 inch.
Wouldn’t hurt to use the 3/4 inch, but the rig plumbing is all 1/2 inch. So your flow would be limited by the plumbing and the orifice that the water is exiting at a given pressure.
 

7426TRISS

Well-known member
I have the Clear Souce Filter, with a Vevo Water Softener, with quick connects, works great.

We never drink from the incoming water, just for dishes and showers
 

M and E

Well-known member
@BryanValRox @7426TRISS @Long Islander Thanks for the feedback and advice. I'm going to DIY it and see how it goes. I ordered this today to build a fixed mount filtration system. If nothing else, I'll only be out 80 bucks as if this does not work I'm going with the ClearSource. I'm sure it will be fine though.
1746410267488.png

1746410358173.png

1746410414400.png
 

Midnight Rider

Well-known member
I just use a in line charcoal filter you attach to the hose. I don’t drink the rv water so a charcole filter works just fine for me. Not expensive and I just use several per season. I am sure the big expensive multi chambered water filters work great, just seems like overkill to me?
 

Long Islander

Active member
Thanks! I just came back here to see if there were any more posts as I am searching for parts. I like projects like this. Honestly, I'd never thought about building my own until yesterday. I'm going to give it a shot. I'm curious though why you chose 1/2 inch vs. 3/4 inch filters. I've seen both but I figure I have the greatest potential for flow rate with the 3/4 inch

Thanks! I just came back here to see if there were any more posts as I am searching for parts. I like projects like this. Honestly, I'd never thought about building my own until yesterday. I'm going to give it a shot. I'm curious though why you chose 1/2 inch vs. 3/4 inch filters. I've seen both but I figure I have the greatest potential for flow rate with the 3/4 inch.
Actually I did use 3/4"... My error. I chose filter housings with 3/4" metal (stainless steel) threaded inserts instead of plastic. I'll post a few pics of it in the morning.
 

M and E

Well-known member
I just use a in line charcoal filter you attach to the hose. I don’t drink the rv water so a charcole filter works just fine for me. Not expensive and I just use several per season. I am sure the big expensive multi chambered water filters work great, just seems like overkill to me?
I'm uncertain if it is overkill if an owner isn't going to drink the filtered water. I'll look into it. I do drink the water from the source at most campgrounds I've been to (at least I haven't found myself in a position where I wouldn't).
 

BryanValRox

Well-known member
I just use a in line charcoal filter you attach to the hose. I don’t drink the rv water so a charcole filter works just fine for me. Not expensive and I just use several per season. I am sure the big expensive multi chambered water filters work great, just seems like overkill to me?
Well, I guess overkill is my middle name😂.
I go as far as running an in-line charcoal filter at the pedestal, prior to the water entering the Clear Source.
My take is that it will capture anything “large” and help to extend the life of the Clear Source elements. It also prevents any sediment from plugging the screen and entering the nautilus panel. The in lines are economical.(debatable)
After inspections of the Clear Source trio at the end of the season last year, I found them to look like new and found no evidence of sediment at all, so I opted to recycle them this season. ( we are weekend warriors, so usage is low)
First trip out two weeks ago to Cape Charles, Va installed a new in-line at the pedestal and everything flowed and worked fine.
 

BryanValRox

Well-known member
I am going to see it being built at the factory next week, Thursday, and it will be completed on the 12th. So we imagine it will be here around the 19th.
Hey Mike, any chance you could get a few pictures of how the metal floor heating ductwork is installed in the coach?
I am courteous if it is set in separately or if it could be build into a floor panel assembly and set in place as a unit on the line.
 

M and E

Well-known member
Hey Mike, any chance you could get a few pictures of how the metal floor heating ductwork is installed in the coach?
I am courteous if it is set in separately or if it could be build into a floor panel assembly and set in place as a unit on the line.
I will certainly do my best to get those pictures. I'm trying to see if fishing the camera cable through the ceiling is worth the squeeze.
 

Long Islander

Active member
Attached is a picture of my DIY water filter. There aren't any filters in it at the present time, but they are easily added by unscrewing the clear bottoms and dropping in a 10x3 filter. The handles on the top of each housing permit me to bypass that filter if it gets clogged. In my opinion this feature isn't aren't necessary, but they were on there. We've used this filter a couple years now and so far we haven't needed to bypass a filter. I put the pressure gauge on the output side of the filter, so I could know exactly what the pressure is going into the trailer. I generally leave the filter on the ground, up front under the drivers side of the trailer. I loop the red bike lock cable around the stabilizer to make it harder to steal. I connect it to the trailer using a 3 foot piece of hose with quick connects on each end. The stand was made from a piece of 3/4" wood with two 6" long pieces of 4" PVC pipe mounted to the board. Originally I was going to mount the filter on to the wall inside the storage bay, but we were leaving on a trip so I just quickly threw the stand together. I was so happy with how the stand worked, I scrapped the idea of putting it in the storage bay and and I painted the it black to improve its look. All it basically does is keep the filter from falling over.

I used these three clear housings with handles because they were so inexpensive (less than $12 each) and they had 3/4" stainless steel threaded inserts. I didn't want to use housings that used plastic treaded inserts. There are two schools of thought about using clear or solid filter housings. I would have preferred to use solid filter housings, mainly to keep the light out. Having said the using clear enable me to see if the filters look dirty without having to open them up. I'm amazed how dirty the first sediment filter can get.
 

Attachments

  • Water Filter.jpg
    Water Filter.jpg
    432.7 KB · Views: 12

M and E

Well-known member
Attached is a picture of my DIY water filter. There aren't any filters in it at the present time, but they are easily added by unscrewing the clear bottoms and dropping in a 10x3 filter. The handles on the top of each housing permit me to bypass that filter if it gets clogged. In my opinion this feature isn't aren't necessary, but they were on there. We've used this filter a couple years now and so far we haven't needed to bypass a filter. I put the pressure gauge on the output side of the filter, so I could know exactly what the pressure is going into the trailer. I generally leave the filter on the ground, up front under the drivers side of the trailer. I loop the red bike lock cable around the stabilizer to make it harder to steal. I connect it to the trailer using a 3 foot piece of hose with quick connects on each end. The stand was made from a piece of 3/4" wood with two 6" long pieces of 4" PVC pipe mounted to the board. Originally I was going to mount the filter on to the wall inside the storage bay, but we were leaving on a trip so I just quickly threw the stand together. I was so happy with how the stand worked, I scrapped the idea of putting it in the storage bay and and I painted the it black to improve its look. All it basically does is keep the filter from falling over.

I used these three clear housings with handles because they were so inexpensive (less than $12 each) and they had 3/4" stainless steel threaded inserts. I didn't want to use housings that used plastic treaded inserts. There are two schools of thought about using clear or solid filter housings. I would have preferred to use solid filter housings, mainly to keep the light out. Having said the using clear enable me to see if the filters look dirty without having to open them up. I'm amazed how dirty the first sediment filter can get.
I really like that! Thanks a million for the details and the picture! Where did you find the stainless steel disconnects (if you don't mind sharing)? I have been looking for them on another project and was not having much luck. Maybe I'm using the wrong search terms. Thanks again! Mike
 

Long Islander

Active member
I bought most of the stuff on Amazon, except the nipples and stainless Tee fitting.

Below is the reducing bushing to mount the gauge:
https://www.amazon.com/dp/B08LK55Z7T?ref_=ppx_hzsearch_conn_dt_b_fed_asin_title_8

Below is the link to the Gauge:
https://www.amazon.com/dp/B0C5MKF7VY?ref_=ppx_hzsearch_conn_dt_b_fed_asin_title_8

Below is the link for the Stainless Steel quick disconnects:
https://www.amazon.com/dp/B0C5P84NHN?ref_=ppx_hzsearch_conn_dt_b_fed_asin_title_8

Below is the link to the Adapters to connect the quick disconnects to the 3/4" pipe thread. All of the quick disconnects that I found would only connect to a hose thread. So I needed to convert between the two types for both ends, so there's 2 links
https://www.amazon.com/dp/B08LK55Z7T?ref_=ppx_hzsearch_conn_dt_b_fed_asin_title_8
https://www.amazon.com/dp/B0CP388L73?ref_=ppx_hzsearch_conn_dt_b_fed_asin_title_8

I used a bunch of 3/4" stainless nipples and a stainless tee that I picked up a Lowes or HD. I also installed quick connects on my potable water hose as well (https://www.amazon.com/dp/B06Y4T5V52?ref_=ppx_hzsearch_conn_dt_b_fed_asin_title_5) As a general rule I don't usually mix metals, meaning I don't connect stainless steel to brass or vice versa. My water hose has brass fittings so I used brass quick connects. Is it a big deal if you mix metals, probably not, but I played it safe.

Lastly don't forget to use pipe dope or Teflon tape.

Have Fun!

Bob
 
Last edited:
Top