• Click here to access some of the presentations made during the 2022 National Rally

Starlink Mini roof mount/28v feed

KCAlis

Well-known member
Here’s my experience mounting and using the Starlink Mini on our ‘25 310RL.

Goal: Internet and cell connectivity in 5G “dead zones”, during no AC power situations and while on the road.

Hardware:
Installation details:

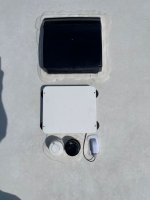
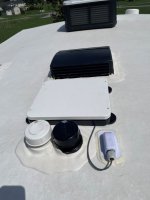
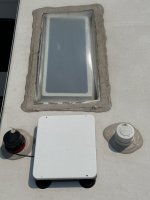
Mini location: Flat mounted on roof avoiding roof obstructions, close to wire chase for minimal exposure of the power lead and protected from road wind. Central to trailer for good WiFi coverage of trailer and tow vehicle.
IMG_7791.jpeg
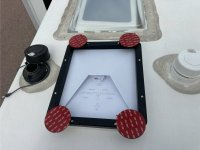
Pre-attachment prior to peeling the VHS pads
IMG_7954.jpeg
Praying the skylight geometry will provide some wind protection.

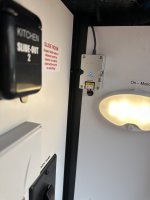
Power: Direct connected to 12v bus bar with short lead to breaker, 14 gauge wire to up-volt transformer (per best practice advice) in accessible location, power cable with Starlink weatherproof connectors on both ends. The plan is to use the Starlink supplied 120v-12v wall wart instead of battery power if ever needed.
IMG_7956.jpeg

Observations:
-Veritas Vans mount gives rock solid attachment.
-Alliance rested the wire chase on top of the water heater styrofoam insulation necessitating a redneck fix.
-WiFi coverage is excellent throughout the trailer and good in the immediate area and tow vehicle cab.
-Uptime has been 99+% although heavy precip will break the link.
-100 GB has been barely sufficient so now considering the 300 GB plan. I keep most WiFi connected devices “Paused” if they really don’t need access to the internet, eg. Brother laser printer. “Paused” does not drop them from the WiFi network.
-Data download far exceeds the speed we saw with our earlier Visible hotspot and mini-router solution.
 

Midnight Rider

Prominent Member
Here’s my experience mounting and using the Starlink Mini on our ‘25 310RL.

Goal: Internet and cell connectivity in 5G “dead zones”, during no AC power situations and while on the road.

Hardware:
Installation details:

Mini location: Flat mounted on roof avoiding roof obstructions, close to wire chase for minimal exposure of the power lead and protected from road wind. Central to trailer for good WiFi coverage of trailer and tow vehicle.

View attachment 5580
Pre-attachment prior to peeling the VHS pads
View attachment 5579
Praying the skylight geometry will provide some wind protection.

Power: Direct connected to 12v bus bar with short lead to breaker, 14 gauge wire to up-volt transformer (per best practice advice) in accessible location, power cable with Starlink weatherproof connectors on both ends. The plan is to use the Starlink supplied 120v-12v wall wart instead of battery power if ever needed.

View attachment 5581

Observations:
-Veritas Vans mount gives rock solid attachment.
-Alliance rested the wire chase on top of the water heater styrofoam insulation necessitating a redneck fix.
-WiFi coverage is excellent throughout the trailer and good in the immediate area and tow vehicle cab.
-Uptime has been 99+% although heavy precip will break the link.
-100 GB has been barely sufficient so now considering the 300 GB plan. I keep most WiFi connected devices “Paused” if they really don’t need access to the internet, eg. Brother laser printer. “Paused” does not drop them from the WiFi network.
-Data download far exceeds the speed we saw with our earlier Visible hotspot and mini-router solution.
Nice job showing how to do all this.

glad it has stayed put on the roof.
 

M and E

Prominent Member
Nice job on all of this. I think the antenna tech on those minis is really cool allowing it to pick up signal even when not facing North.

If you ever need to remove the VHB, use braided fishing line underneath it in a sawing motion.
 

KCAlis

Well-known member
Nice job on all of this. I think the antenna tech on those minis is really cool allowing it to pick up signal even when not facing North.

If you ever need to remove the VHB, use braided fishing line underneath it in a sawing motion.
Thank you. The Mini knows it’s flat mounted! Right now the only obstruction is the very top of the wire chase. Very pleased.
 

Headed West

New member
I followed KCAlis' lead on mounting the Starlink mini on the roof in the Veritas Vans mount attached with magnents and the VHB metal discs. Thanks for your post!

Where I differed was in routing the cable from the roof to the interior and I wanted access to swtching the starlink on/off from inside the coach.

My experience is on my 2026 Avenue All-Access 25RL

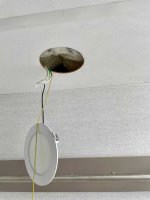
I installed a roof gland a few inches to the side of the black pipe on the roof. To locate the entry point, from the interior, I pulled down the LED lamp from over the toilet. It's held in place by spring clips; easy to remove and re-install. The yellow pull cord that is visible here was put in place later in the process.
IMG_3509ss.jpg


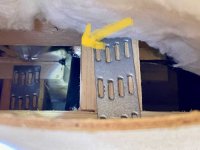
There I discovered that sunlight was coming aoround a void in the dicor surrounding the black pipe! That was a good thing to catch and repair in the process.
IMG_3512ss.jpg

Continuing inside this access point to the left of the black pipe that is visible behind strong tie, there is a hole that is a wire chase which routes down behind the switch panel. I removed the cover behind the switch panel and the TV. Again from the bathroom light fixture access point I ran a fish tape down to behind the switch panel and then pulled up the yellow pull cord.

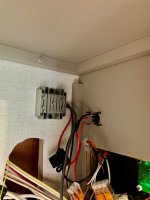
Once the starlink mini cable was run through a hole in the roof made to the left of the black pipe and the roof gland was installed, the pull cord was used from behind the switch panel to bring the starlink cable down to behind the switch panel. There the cable was connected to a 12V to 30V power convertor.
IMG_3514ss.jpg

I swapped out an orange WAGO lever nut, from a 2 to 3 connection one, it was being used to feed the 12V to the tank heaters. Looks like heavy 12 or 14 guage wire that is used to heat all three tanks. I used that 12V and ground to supply power. I don't think that will be an issue. I couldn't figure out how to cleanly run power up to the bus bar in the battery bay or I would have done it.

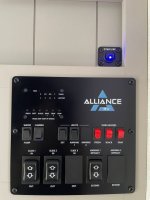
The final connection was made to a lighted switch, which controls the fused 12V to 30V convertor.

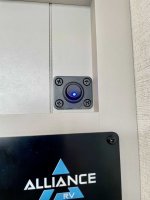
Here is the view to operate the starlink from the swtch which is mounted just above the normal switch panel.
IMG_3513ss.jpg
I have some white dry transfer letters on order that I'll attempt to use to label the switch. Not really necessary but hopefully will be a nice touch.
 

WE3ZS

Active member
We are just back home from our first cross country trip (8250 miles) with the new Starlink Mini. We also used the Veritas Vans case/mount, magnets and VHB backed discs, but we elected to mount the mini on the roof of the truck vs the trailer so we would have the same connectivity while out exploring unhitched. It has worked out very well for us. Power supply block plugged into trucks onboard inverter when running and when parked back at the campsite I switch it over to an extension cord that gets plugged into the fiver or the power pedestal, whichever is closest. We ran the power supply cable in through the sliding rear window of the truck with a section of foam padding filling the small gap from having the window cracked open for the cable.
 
Top