BryanValRox
Elite Member
RockDr, that really cleaned up nicely!It looks even better today, once it dried out. That mold killer is a keeper!

RockDr, that really cleaned up nicely!It looks even better today, once it dried out. That mold killer is a keeper!
I've never seen that before. I'm honestly curious why they would do something in an RV that is the exact opposite of residential code. It's like these product engineers are sitting around drinking beers and saying "You know what would be funny???"Hot water on this mixer is made to be on the right side. Even fixture manufacturers are not following age old traditions in plumbing...
I have it in a warehouse 5 min away. I pay storage unfortunately. I live on a lake and ready to move to some acreage again. I hope to change that if the housing market changes.It's really coming along! Point of curiosity, is your rig on your property?
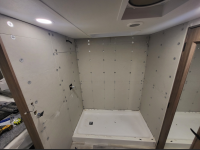
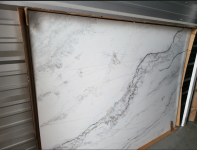
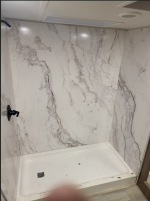
Great work! Looks awesome and now you and we know what's back there.Finally got the wall panels up! Trim is tomorrow. I ran the seam tape around the shower before installing the panels and it was easy to work with. I also ran the shower panel to cover behind the toilet. I also moved the toilet supply out of the wall. Any future issues, will no longer hide in the wall. I also added separate shut offs for the toilet, shower, and sink in the pass through area. Mine was not plumbed individually, but now they are. These panels are 1/4" thick, so having a wavy shower wall, doesn't appear to be a factor like the original installation. Shower door arrived today, so I should be done this week! Next step, will be the road test. I am going to be disappointed if the flexing of the trailer defeats this build...LOL
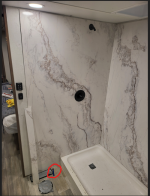
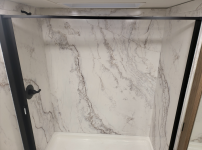
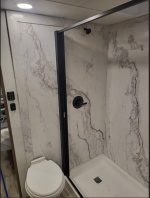
Looks great!Shower is done! I will let everyone know how this weathers the road in a year. I really like the simplicity of the shower door, as opposed to the glass doors. The bathroom feels much bigger, with the door retracting when not in use. Cleaning it should be much easier now. I noticed that they sell replacement cartridges, so we shall see what "Mildew resistance" really means.
Fantastic job! Really like the NAUTILUS shower door, it will be an option of necessary.Shower is done! I will let everyone know how this weathers the road in a year. I really like the simplicity of the shower door, as opposed to the glass doors. The bathroom feels much bigger, with the door retracting when not in use. Cleaning it should be much easier now. I noticed that they sell replacement cartridges, so we shall see what "Mildew resistance" really means.