• Click here to access some of the presentations made during the 2022 National Rally

Kitchen Sink Not Draining

divinIN

Active member
Good Day Everyone,

I have a 2021 390MP. The kitchen sink is not draining. My son and I spent a couple of hours last night trying to fix it. Here is what we have tried:
  1. Snaked sink several times.
  2. Snaked through bathroom sink.
  3. Snaked through shower. In this I did get some hair out but the shower was never the issue.
  4. Based on some info we found online we checked the roof vents. There are three. The furthest aft vent which comes out slightly forward and left of the middle AC unit looked like it had water way down in it - we could see the reflection and movement of the water when we used a flashlight.
I don't think seeing evidence of water is good, but not sure where the issue may be, especially after having snaked the lines several times with no evidence of blockage.

Any suggestions/ideas would be appreciated. Thank you everyone.
 

divinIN

Active member
Totally appreciate the response - thank you. All grey tanks are empty and I actually had a thought this morning right along those lines. I thought perhaps one of the two valves were broken and wasn't emptying. However, I checked this morning and the sensors are showing both as empty. :( I was really hoping one of the valves wasn't working because that's something I know I can address.
 

BryanValRox

Well-known member
Hello folks, I guess I would offer the following:
1. From everything I have read across all manufacturers, never trust the tank sensors!
2. Standing water in the vent line is a problem, But would seem odd because vents should Not be able to trap water, it would defeat the purpose. ( remember air in water out). So this begs the question could the tank in fact be full, remember water always seeks it own level.(if the tank is full, the level would start to rise in the vent)
3. If you have snaked the entire way to the tank , and the tank is in fact empty, I would think your issues is with either the vent or a air immentance valve. Or an obstruction in the main sewer line if tank really isn’t empty.

Hope these suggestions help, please follow up with your findings, so we can all sharpen our saw!
 

divinIN

Active member
Hello folks, I guess I would offer the following:
1. From everything I have read across all manufacturers, never trust the tank sensors!
2. Standing water in the vent line is a problem, But would seem odd because vents should Not be able to trap water, it would defeat the purpose. ( remember air in water out). So this begs the question could the tank in fact be full, remember water always seeks it own level.(if the tank is full, the level would start to rise in the vent)
3. If you have snaked the entire way to the tank , and the tank is in fact empty, I would think your issues is with either the vent or a air immentance valve. Or an obstruction in the main sewer line if tank really isn’t empty.

Hope these suggestions help, please follow up with your findings, so we can all sharpen our saw!
Thank you. I am going to crawl under the rig tomorrow and figure out how to make sure the tank is empty. I do appreciate your response.
 

divinIN

Active member
My son and I crawled under the rig today and had to loosen a small section of the corrugated plastic undercarriage. The good news is you were both right, the grey tank is most definitely full. The bad news is the pull cord is not opening the valve. Is there a way to manually open the valve so I can empty the tank before fixing it?
 

Oregon_Camper

Forum Moderator
Staff member
My son and I crawled under the rig today and had to loosen a small section of the corrugated plastic undercarriage. The good news is you were both right, the grey tank is most definitely full. The bad news is the pull cord is not opening the valve. Is there a way to manually open the valve so I can empty the tank before fixing it?
Could you upload a few pictures, so we can see the current situation?
 

BryanValRox

Well-known member
Would you happen to have a picture? It could be helpful to see to make a suggestion, as I do not have any direct experience with the valve.
 

divinIN

Active member
Could you upload a few pictures, so we can see the current situation?
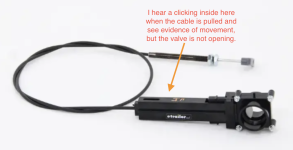
More information before I get to the pictures tomorrow. My son pulled the cable while I was at the valve end and I can feel movement in the cable housing all the way to the valve and see/hear a clicking within the first section. Here's a stock photo I've captured to try to illustrate what I'm seeing for now.
 

Attachments

  • Screenshot 2023-12-15 at 5.47.03 PM.png
    Screenshot 2023-12-15 at 5.47.03 PM.png
    206.5 KB · Views: 7

BryanValRox

Well-known member
Well, the picture certainly helps show what you are up against.
Might be stating the obvious, but it would appear that you need to figure out how to split open that section of the valve to see what has broken or become disconnected. If you gain access to that connection you should be able to figure out how to manually open it and hopefully repair it without the need to replace it.
 

BryanValRox

Well-known member
See if this link will work for you. It shows how to replace the cable. Looks very similar to the one you showed.
It appears that the cable is connected to the valve slide via a socket and set screw.
This one has a slot in it for access so splitting the valve isn’t necessary. This video shows the cable connection clearly.


divinIN

Active member
Hello Everyone,

Thank you again to all who took the time to respond. We found and fixed the issue yesterday. The short version - the knife valve is operating just fine. The issue turned out to be stinky and gross - coagulated fat had built up to such a point that it blocked probably 95% of the drain even with the valve open. I got the tank emptied and cleared so we're back in business.

The longer version. Even after discovering that fat was the issue I wanted to be absolutely certain nothing was wrong with the valve given how much effort was required to access the valve to begin with. Here's some photos and the process I went through just in case it helps anyone else in the future. I have no idea if this is the right way to do this, but it worked for me and nothing broke. :)
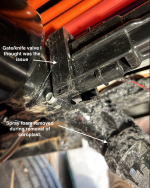
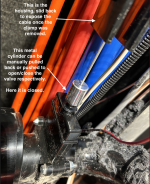
  1. Removed enough of the coroplast (corrugated plastic sheet) to get a clear view of both sides of the valve. To do this I had to scrape away some of the spray foam covering the grey water drain pipe.

  2. step1.png

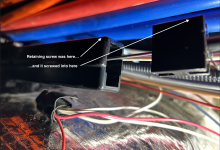
  3. Removed the retaining screw. This allowed me to get access to the actual cable and see if there were any issues with it. I had my son pull/push the cable from the service bay, which ended up exposing the piece the retaining screw was screwed into.

  4. step2.png

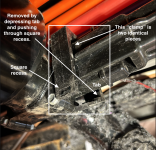
  5. Removed the clamp so I could slide the cable housing off of the cable.

  6. step3.png

  7. step4.png

  8. With that done, even though I couldn't see the valve yet, I could tell it was operating correctly but still wanted to be sure, and I still didn't know why the tank wasn't draining.

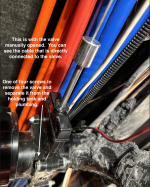
  9. With the valve manually opened, I snaked the grey water drain pipe by manually guiding the snake line up and around the corner and into the grey water pipe. This started breaking up what I found out later was lots of fat, but it still wasn't flowing as much as I knew it should.
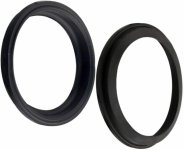
  10. I removed the four screws which started draining a slow drip process of the smelly grey water, but even with the valve removed it wasn't the grey water deluge I was expecting. You can see the valve itself is just sandwiched between the nut head and the nut. Once all four screws are off the whole valve just drops away, exposing the main opening in the holding tank. Important - there are two gaskets, one on each side of the valve that may come off. Make sure you don't lose those.

  11. step5.png

  12. At this point I regrettably stopped taking pictures, I'm sorry. I didn't even realize that until just now while typing this response. It was late, smelly, very cold, and my calf/shin cramped a couple of times while stuffed under the trailer. Haha!

  13. What we ended up doing is capturing the grey water in a 5 gallon bucket as I reached into the main holding tank opening with my fingers and grabbing the larger chunks of fat. That was fun....

  14. When I was confident the tank was empty (about 3 buckets full of waste water and fat), we reassembled the system using the four screws. The only tricky part here is making sure the two gaskets I mentioned in step 10 are put back in place. They look like the following picture. When putting them back in place, the narrower part on each gasket faces the valve itself - so the two narrow parts face each other in the end, one gasket on the holding tank side of the valve and the other on the drain pipe side of the valve. I hope that makes sense. They won't actually stay in place if you put them in wrong, so it will make more sense if you end up doing this yourself.

  15. gaskets.jpg

  16. That's it, really. The next thing for me is to find the best fat dissolver so this doesn't happen again. Take care all.
 

Jim Beletti

Owner Experience Liaison
Staff member
@divinIN - wow, quite the ordeal. Happy to hear you solved this one and thank you for sharing the detail with everyone here.

I once helped a pal change out 4 tank valves. I can't remember if it was the kitchen gray or the bathroom gray tank valve - but the buildup in the 1.5" ABS pipe leading to the valve was crazy. It was like putty. It was really restricting the water flow out of the tank as well.
 

divinIN

Active member
@divinIN - wow, quite the ordeal. Happy to hear you solved this one and thank you for sharing the detail with everyone here.

I once helped a pal change out 4 tank valves. I can't remember if it was the kitchen gray or the bathroom gray tank valve - but the buildup in the 1.5" ABS pipe leading to the valve was crazy. It was like putty. It was really restricting the water flow out of the tank as well.
That sounds exactly like what I experienced. We dumped a whole bunch of septic/holding tank bacteria in both grey tanks yesterday and are going to let that stew for a couple of days, hopefully breaking down all that I missed.
 

tjbristle

Member
Hello Everyone,

Thank you again to all who took the time to respond. We found and fixed the issue yesterday. The short version - the knife valve is operating just fine. The issue turned out to be stinky and gross - coagulated fat had built up to such a point that it blocked probably 95% of the drain even with the valve open. I got the tank emptied and cleared so we're back in business.

The longer version. Even after discovering that fat was the issue I wanted to be absolutely certain nothing was wrong with the valve given how much effort was required to access the valve to begin with. Here's some photos and the process I went through just in case it helps anyone else in the future. I have no idea if this is the right way to do this, but it worked for me and nothing broke. :)
  1. Removed enough of the coroplast (corrugated plastic sheet) to get a clear view of both sides of the valve. To do this I had to scrape away some of the spray foam covering the grey water drain pipe.

  2. View attachment 1571

  3. Removed the retaining screw. This allowed me to get access to the actual cable and see if there were any issues with it. I had my son pull/push the cable from the service bay, which ended up exposing the piece the retaining screw was screwed into.

  4. View attachment 1572

  5. Removed the clamp so I could slide the cable housing off of the cable.

  6. View attachment 1573

  7. View attachment 1574

  8. With that done, even though I couldn't see the valve yet, I could tell it was operating correctly but still wanted to be sure, and I still didn't know why the tank wasn't draining.

  9. With the valve manually opened, I snaked the grey water drain pipe by manually guiding the snake line up and around the corner and into the grey water pipe. This started breaking up what I found out later was lots of fat, but it still wasn't flowing as much as I knew it should.
  10. I removed the four screws which started draining a slow drip process of the smelly grey water, but even with the valve removed it wasn't the grey water deluge I was expecting. You can see the valve itself is just sandwiched between the nut head and the nut. Once all four screws are off the whole valve just drops away, exposing the main opening in the holding tank. Important - there are two gaskets, one on each side of the valve that may come off. Make sure you don't lose those.

  11. View attachment 1576

  12. At this point I regrettably stopped taking pictures, I'm sorry. I didn't even realize that until just now while typing this response. It was late, smelly, very cold, and my calf/shin cramped a couple of times while stuffed under the trailer. Haha!

  13. What we ended up doing is capturing the grey water in a 5 gallon bucket as I reached into the main holding tank opening with my fingers and grabbing the larger chunks of fat. That was fun....

  14. When I was confident the tank was empty (about 3 buckets full of waste water and fat), we reassembled the system using the four screws. The only tricky part here is making sure the two gaskets I mentioned in step 10 are put back in place. They look like the following picture. When putting them back in place, the narrower part on each gasket faces the valve itself - so the two narrow parts face each other in the end, one gasket on the holding tank side of the valve and the other on the drain pipe side of the valve. I hope that makes sense. They won't actually stay in place if you put them in wrong, so it will make more sense if you end up doing this yourself.

  15. View attachment 1577

  16. That's it, really. The next thing for me is to find the best fat dissolver so this doesn't happen again. Take care all.
Thank you so much for taking the time to take pictures and label them and talk about your experience! I purchased a 2022 model of that fifth wheel a few months ago used. About a month ago I noticed the kitchen sink wasn’t draining well. Then it emptied fine and I got busy and didn’t think about it again. I just got back from a trip and noticed when I had the water running that it was not emptying. Sounds like I may have a similar experience in my near future!
 

divinIN

Active member
Thank you so much for taking the time to take pictures and label them and talk about your experience! I purchased a 2022 model of that fifth wheel a few months ago used. About a month ago I noticed the kitchen sink wasn’t draining well. Then it emptied fine and I got busy and didn’t think about it again. I just got back from a trip and noticed when I had the water running that it was not emptying. Sounds like I may have a similar experience in my near future!
You are most welcome. That was a smelly experience. I read somewhere or watched it somewhere, can't remember, that working on stagnant grey water is just as bad, if not worse, than black. I'm leaning towards concurring.

And I should have posted an update.

What I would suggest is to get an enzyme-based fat/grease septic tank treatment product, fill your grey tanks with water, and dump a good quantity of that in one or both (if you have two as I do). Let it sit for a few days or as long as you can to let the enzymes do their thing. That is what we did, twice actually, with about 3-5 days between "soaks." Everything is draining fine now and I will be regularly adding that or a similar product, or even Dawn soap, to both tanks to prevent this from happening again.
 
Top