• Click here to access some of the presentations made during the 2022 National Rally

385FL Rear MORryde RV Cargo Slide Tray- MOUNTED TO FLOOR ripped loose

SCuz

Member
When I arrived at my camp site and rolled out my tray with it also tipped out and nearly crashed to the ground while fully extended! Almost ripped my arm off it was so heavy.

Has anybody experienced the multiple tiny wood screws that secure the MORryde RV Cargo Slide Tray to the basement floor boards come loose or strip the wood over time? Im amazed Alliance would use tiny (looks like #6 1/2 inch) screw to secure this device that holds hundreds /thousand pounds of items. I was under the impression that Alliance had a higher standard in their workmanship/quality when I researched prior to buying this RV in 2024...maybe my expectations were a little to high.

The question I have is how thick is the basement floor borad it is on, and if there are any holding tanks underneath? (and if so) Is there any clearence between the bottom of the wood and the tank?

Since the intial screw holes are stripped I'm going to to use #14 1 1/4" wood screws to resecure it until i get back home which is 300 miles of bumpy NY and PA highways.

Thanks for your help in advanced
 

George

Prominent Member
I would bet that the pass through floor is ⅝" Truboard (wafer wood). And there are waste tanks underneath it. There is probably air space between the tanks and the floor but I would be very leery of using 1-¼" screws.
Unless someone here has first hand knowledge of this I'd not do anything until contacting service@alliancerv.com with your VIN and questions. Just leave the tray in travel mode until you know. $0.02 by George
BTW - The MORryde RV Cargo Slide Tray has a weight capacity of 500 lbs. And if you have "thousands" of pounds in the pass through you better be on a dually. 😜 Get to a CAT scale.
 

Oregon_Camper

Forum Admin
Staff member
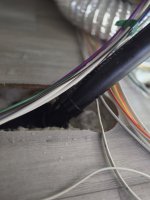
  1. To check floor thicken, pop off the pass-through wall and look where the black tank pipe goes down. You will easily see the thickness there.
  2. Longer screws won't help...you'll just drive it down more, but have the extra length below the flooring
  3. If you want to put it back where you had it, just use molly bolts
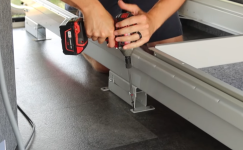
  4. Here is picture of my slide tray being installed by MorRyde at the National Rally in 2024. I don't over load the tray with a lot of weight and it has never had an issue
    1. Here is link to entire video if you care to watch the whole thing
1783021929450.png
 
Last edited:

SCuz

Member
I would bet that the pass through floor is ⅝" Truboard (wafer wood). And there are waste tanks underneath it. There is probably air space between the tanks and the floor but I would be very leery of using 1-¼" screws.
Unless someone here has first hand knowledge of this I'd not do anything until contacting service@alliancerv.com with your VIN and questions. Just leave the tray in travel mode until you know. $0.02 by George
BTW - The MORryde RV Cargo Slide Tray has a weight capacity of 500 lbs. And if you have "thousands" of pounds in the pass through you better be on a dually. 😜 Get to a CAT scale.
Thanks, the slide has a capacity of 800lbs and the tray weight of the tray is 150lb so it can be close to 1000. Unfortunately I had 200lbs of dry ice in yeti's that were about 80lbs. And they were close to the area that rolls out to keep my broken 18 month old norcold chilled in this 100 degree heat this week. I will secure a few of the mounts with the 14 size and 1 inch for now. It needs to be somewhat secured for these roads. The Ice will be gone and I can move the heavier items to the back part of the slide.
 

SCuz

Member
  1. To check floor thicken, pop off the pass-through wall and look where the black tank pipe goes down. You will easily see the thickness there.
  2. Longer screws won't help...you'll just drive it down more, but have the extra length below the flooring
  3. If you want to put it back where you had it, just use molly bolts
  4. Here is picture of my slide tray being installed by MorRyde at the National Rally in 2024. I don't over load the tray with a lot of weight and it has never had an issue
    1. Here is link to entire video if you care to watch the whole thing
View attachment 5481
Looks great and thanks for the feedback.
The major concern is have is my tray is not side to side, but front to back and there were a few times on this trip we went from 60 to 15 is seconds for typical east coast rubber neckers for minimal incidents. So, any load shift could be a problem. Even though I secure everything with extra bungees.

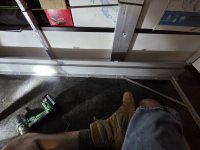
The floors could be 5/8" to 3/4" but it's hard to tell now since I spent most of last month trying to mouse proof my living quarters and storage basements front and back since my bedroom and living quarters are raised. I attached a picture or 2 of my pre mouse proof foam cut outs. Also my MorRyde rails are flat to the flooring and have about 20 holes on each side to secure the unit. Pretty much every back screw ripped out on the back side on both sides. Had about 18 screws to replace
 

Attachments

  • 20260525_123302.jpg
    20260525_123302.jpg
    248.4 KB · Views: 12

George

Prominent Member
Thanks, the slide has a capacity of 800lbs...
The major concern is have is my tray is not side to side, but front to back...
My bad, 😳 I did not look up your floorpan so I didn't realize the tray is actually in the tail and slides fore/aft. Weight behind the axles can be a good thing sometimes as it unloads pin weight from your truck. That's why I had to add my rear hitch-mounted toolbox.
I wonder why that tray can carry 60% more than a pass through tray. Maybe because it's longer?
Sorry to hear about your Norcold. I hope it's a simple fix. I had already decided that if mine ever failed I be installing an inverter and an actual residential 120vac model.
 

Socal-Paul

Well-known member
You could drill the screw holes out to the screw depth out and epoxy a hardwood dowel to put the new ones into,.
 

SCuz

Member
I was able to temporary secure the tray about 20 of the 24 screws that ripped out/and were loose. If this helps: I was able to determine that the flooring is between 1/2 inch to 3/4 inch thick and that in at least 2 spots (were I place a temporary #10 1 inch screw that went through the backside of the floor) had a clearance with no tanks or any other obstructions. I was using the thick round 2.5 inch toothpicks to feel for anything under the floor and nothing was felt.
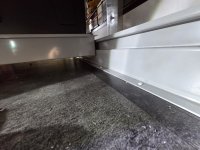
I jammed 2 toothpicks as a filled/shime into each hole and loaded it up with a good wood glue for my #12 3/4" temporay replacement screws. This will be my temporary fix until i get the rv back home from my trip. Then I can have my mechanic check it out and also hopefully get the schematics under that part of my coach from Alliance to hopefully do a preferred toggle bolt setup. I attach the rail pictures of my setup, the screws I placed in were very tight and the wood glue should help eliminated them vibrating loose during travel for a little.

Thanks for everybodys help and ideas.
 

Attachments

  • 20260704_105641.jpg
    20260704_105641.jpg
    398.1 KB · Views: 7
  • 20260704_105656.jpg
    20260704_105656.jpg
    394.7 KB · Views: 7

RockDr896

Well-known member
I didn't pick a size for you, but this threaded wood insert, would most likely serve as a better fix, if you had the time. You could just pry the frame on short blocks and move it side to side to install them. Then you could anchor it down. The clamping strength would be superior to what you have and you can use your blocks to drill the frame for a larger bolt https://www.amazon.com/gp/aw/d/B07ZHCCPKW/?_encoding=UTF8&pd_rd_plhdr=t&hsa_cr_id=0&qid=1783279807&sr=1-2-9e67e56a-6f64-441f-a281-df67fc737124&i=aps&aref=0MDrtK95CP&ref_=sbx__sbtcd_asin_1_title&pd_rd_w=HN04m&content-id=amzn1.sym.2fb72bc8-96ef-420d-b08f-c04b69f36507:amzn1.sym.2fb72bc8-96ef-420d-b08f-c04b69f36507&pf_rd_p=2fb72bc8-96ef-420d-b08f-c04b69f36507&pf_rd_r=H0EF6D537BVX9Q8XARBF&pd_rd_wg=2J0yn&pd_rd_r=38eea3c2-f7cd-4136-afc6-f51d0d9b55cc&th=1
 

SCuz

Member
Tha
I didn't pick a size for you, but this threaded wood insert, would most likely serve as a better fix, if you had the time. You could just pry the frame on short blocks and move it side to side to install them. Then you could anchor it down. The clamping strength would be superior to what you have and you can use your blocks to drill the frame for a larger bolt https://www.amazon.com/gp/aw/d/B07ZHCCPKW/?_encoding=UTF8&pd_rd_plhdr=t&hsa_cr_id=0&qid=1783279807&sr=1-2-9e67e56a-6f64-441f-a281-df67fc737124&i=aps&aref=0MDrtK95CP&ref_=sbx__sbtcd_asin_1_title&pd_rd_w=HN04m&content-id=amzn1.sym.2fb72bc8-96ef-420d-b08f-c04b69f36507:amzn1.sym.2fb72bc8-96ef-420d-b08f-c04b69f36507&pf_rd_p=2fb72bc8-96ef-420d-b08f-c04b69f36507&pf_rd_r=H0EF6D537BVX9Q8XARBF&pd_rd_wg=2J0yn&pd_rd_r=38eea3c2-f7cd-4136-afc6-f51d0d9b55cc&th=1
Thank you it looks like an option in the future. Unfortunately, I'm in the mountains in upstate NY so not close to many locations to get and I'm leaving today for my trip home.
 

SCuz

Member
Here is some information on a 385FL floor and frame print that was sent to me for the following questions:

The question I have is how thick is the basement floorboard it is on, and if there are any holding tanks underneath? (and if so) Is there any clearance between the bottom of the wood and the tank? I believe i need to replace the smaller screws and add toggle bolts to secure this fixture.

NOTE: We trailer this unit a lot and the roads and highways in NY/PA NJ region are very bumpy which creates vibration and fatigue on these small screws and wood over multiple trips. I believe a toggle bolt and or slightly longer and thicker screws are now needed. I have no idea what is under this rail mount area in the camper and need a schematic and or advice on how to secure it.

ALLIANCE REPLY:
Good morning.
Thank you for reaching out about your Paradigm.
Your main floor decking is 5/8 thick and there are no tanks below the rear storage. The tanks are above the axles.
Below is the frame print for the floor and frame.
 

Attachments

  • Alliance 2024 385FL- Floor and Frame Specs.pdf
    120.4 KB · Views: 6

RockDr896

Well-known member
Thats great! Now drill new holes and maybe even use short Lag bolts (Aggressive threads)... in between the current holes. Make sure it never moves. I would not use toggle bolts, since they cannot be easily removed or reused, without dropping the underbelly. That's my 2 cents!!
 

Lantley

Prominent Member
I think the important thing is to use a screw that is threaded all the way to the top with very little shank or unthreaded area. You only have 5/8 to deal with so you want to make sure you have threads in the entire 5/8" area.
Avoid screws that are not threaded at the top.
You want a screw larger than your original screws but huge is not the objective. You need a screw that will fit through your holes with as much thread as possible.
 
Top