
You are using an out of date browser. It may not display this or other websites correctly.
You should upgrade or use an alternative browser.
You should upgrade or use an alternative browser.
Size of battery box
- Thread starter 7ACMike
- Start date
If you're referring to the drop down area for the batteries...just cover that up with wood and forget it is there. Put in whatever size battery you want over the top of it.
Upvote
0
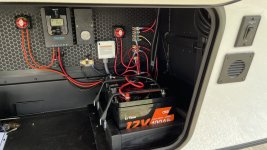
I'm sorry...I thought it was like mine (340RL) where the batteries were in a small, drop down area. Those boxes are only need for AGM/FLD batteries, so you can vent them. If you are going to add lithium, then you can remove the cases and venting hose. The wiring of the batteries is much easier/cleaner without the cases.In the pic's it's showing a black plastic (Camco box I believe) that the batteries are located in. Are you saying remove the box and put a board where it was to attach batteries to?
Upvote
0
Jim Beletti
Well-known member
@7ACMike - similar to what Jim suggested above, in my Paradigm, when I removed my battery box, I pop-riveted in a piece of thick sheet metal and sealed the edges (from the top) with bottom board tape.
Last edited:
Upvote
0
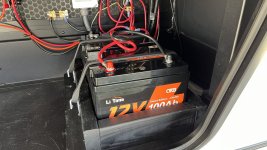
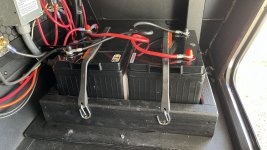
I just replaced the 2 group 24 AGM batteries with 2 Litime 100AH smart batteries. I did remove the OEM battery box and vent, replaced it with 3/4" plywood (18"x24") and boxed the batteries in with 2x4s (17"x11"), painted the box, top & bottom with automotive undercoating. Used silicone form-a-gasket to seal the original opening, screwed it down and then undercoated the entire area from the bottom, Used 24" bungie straps for the hold downs. I removed the vent hose & panel and used the cap from a can of spray paint to close off the vent opening, it fit perfectly. I cut 1/4"to off the top of thecap, inserted it into the vent put them together and remounted it. I'll post photos tomorrow.
Last edited:
Upvote
0
I guess I should mention why I made this change, one is the longer battery life and overall better performance, two is a 50% reduction in weight also I didn't like the idea of 100 pounds of batteries hanging in a thin plastic box, and three is I just like to tinker!!
I should have taken photos during the process of putting all this together, but I can only offer photos of the finished project.
I should have taken photos during the process of putting all this together, but I can only offer photos of the finished project.
Upvote
0


Ramjetr1960
Well-known member
Have you put the batteries in yet?... I ordered group 24 lithium batteries. Apparently they fit...Can anyone tell me the size of the battery box on a 29RL? I a new 29RL ordered and trying to find whether i need group 24 or group 31 batteries?
Upvote
0
I removed the battery box totally and built 1 the correct dimensions and placed it over the hole in floor for a neater, more spacious area. I did buy group 31 as they were a little cheaper also. Reviewed a lot and used the Power Queen with heaters as i live on Iowa. The inverter ready junction box is in the forward compartment mid box on the wall. The inverter is another story. It did not come with an inverter. "INVERTER READY" was the term used. The idea was good but the power wire to the inverter went to the microwave and the microwave wire went to the power side. No way we could figure out how to make that work. My son is an electrical engineer and he tried. Long story short several hrs of thought and we finally dropped the coroplast and ran another wire to the panel and in about an hour we were working correctly. Hope this helps. I did post some pics of my battery box set up I think and if not let me know and I will. Like the trailer though other that the normal factory "unfixes".
Upvote
0