• Click here to access some of the presentations made during the 2022 National Rally

Segmenting my Underbelly project

RockDr896

Well-known member
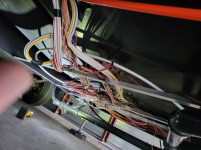
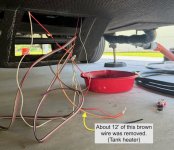
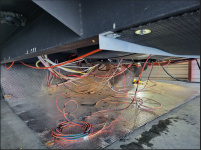
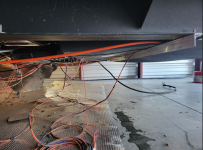
So I have segmented my underbelly in the easiest section, which is front area. I have run it for 1 year and the 1/16" aluminum angle is doing just fine. Now I am tackling the tough section. The chloroplast is some strong and tough stuff, but just look at the cable mess, just laying on the chloroplast. I am hoping Alliance fixes this, so it isn't one more thing a person has to get out of their way, should they have to drop the underbelly for a problem.

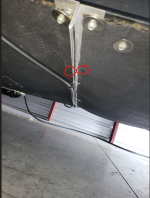
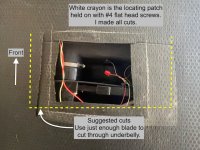
The 2nd picture shows the angle piece and how I mounted it. I will now butt another angle piece to it and marry the chloroplast. So the angle will be 2 angles butt together for a total of 1/8" thick. I am most likely going to thru bolt the center, so it can act as a puller between the two angles when reinstalling.

This section of frame has some convenient I-Beam on both sides and tomorrow I am going to frame it out to support and zip tie the wire too. The bundles of wire are taped together along the way, with electrical tape. I am hoping I can separate the wire runs, but not expecting it to work out. A guy has to try though.

Now that I am staring at the tanks and wires, I am glad I am doing this. I was not liking the idea of cutting underbelly in the blind and patching or taping it all back together. This is my first 5th wheel, so I am glad to fix it when there isn't an issue and I can make a future repair go a bit easier.

FYI--My width in this area is only 75 1/5" wide, so Lowes & Home depot stock this length angle.
 

Attachments

  • 1768331451398.png
    1768331451398.png
    1.1 MB · Views: 68
  • 1768331512306.png
    1768331512306.png
    1,022.3 KB · Views: 66

Bozo

Prominent Member
So I have segmented my underbelly in the easiest section, which is front area. I have run it for 1 year and the 1/16" aluminum angle is doing just fine. Now I am tackling the tough section. The chloroplast is some strong and tough stuff, but just look at the cable mess, just laying on the chloroplast. I am hoping Alliance fixes this, so it isn't one more thing a person has to get out of their way, should they have to drop the underbelly for a problem.

The 2nd picture shows the angle piece and how I mounted it. I will now butt another angle piece to it and marry the chloroplast. So the angle will be 2 angles butt together for a total of 1/8" thick. I am most likely going to thru bolt the center, so it can act as a puller between the two angles when reinstalling.

This section of frame has some convenient I-Beam on both sides and tomorrow I am going to frame it out to support and zip tie the wire too. The bundles of wire are taped together along the way, with electrical tape. I am hoping I can separate the wire runs, but not expecting it to work out. A guy has to try though.

Now that I am staring at the tanks and wires, I am glad I am doing this. I was not liking the idea of cutting underbelly in the blind and patching or taping it all back together. This is my first 5th wheel, so I am glad to fix it when there isn't an issue and I can make a future repair go a bit easier.

FYI--My width in this area is only 75 1/5" wide, so Lowes & Home depot stock this length angle.
I am going to do this this spring. I have to replace waste valves and a leaking/blistered hydraulic line to my driver side middle jack. That mess of wiring….Typical, I guess.
 

RockDr896

Well-known member
Finished up today. The 370FB doesn't have anything in this area to hang or support the excess wire. If I was removing the plumbing, I could have dealt with the tank sensor wires better. I ended up cutting and installing 3 cross members to support and zip tie the wire bundles. This at least gets them out of the way. Everything behind the tires, I am going to leave alone. That area is manageable, due to the spare tire and very little in that area of concern.

So basically, my underbelly area is divided into 3 separate areas and very manageable to remove and put back in place. What sucks is working on my back at 60 and wearing reading glasses..LOL!! I did end up using underbelly tape to seal the chloroplast connection to the angle. Now I can basically remove the bolts along the sides and pull back a section if needed. I hope this helps others prepare for future repair headaches!
 

Attachments

  • 1768425951780.png
    1768425951780.png
    973.9 KB · Views: 37

RockDr896

Well-known member
UPDATE:

I did not like the underbelly tape I used. I had some areas I could not screw the coroplast to the angle, because of tank locations.

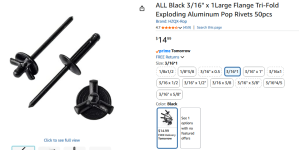
I ended up using some rivets, I used on the back wall repair of my 370FB. They were perfect for the areas where I needed to attach the coroplast to the angle in the Grey Tank areas. Although my knife work was sub-par, there is a low chance of critters or water exploiting this modification. It looks a lot better now. The tape was falling down, with the rig just sitting in storage. It was never going to survive travel.

The challenge for a 1 man project:
--The coroplast had all the wires laying on it. It either stretched, or it is not pulled tight when it is installed. Trying to get that extra slack out of it, proved to be not worth the effort.
--Because of the wires, cutting the coroplast requires you to make sure wires are not cut or nicked.
--I found a few wires under the tanks, that needed to be worked free and bundled out of the way.

Bonus: I have less extra rivets laying around
 

Attachments

  • 1778501968977.png
    1778501968977.png
    497 KB · Views: 21
  • 1778501998269.png
    1778501998269.png
    148 KB · Views: 21

George

Prominent Member
Looks like good work so far.
I wish RV mfg's would pay as much attention to things not seen as they do to things seen. e.g. wiring and duct work. The Coroplast under most trailers look like a full diaper because of the wire, hyd. hoses and Pex lying on it. And if a tank does happen to drop it can rip out wires in very inaccessible places.

I'm wondering why you secured the Coroplast on the bottom of the angle. Did you discount the idea of attaching the angle under the C. and then sandwiching the C. between the frame and angle? Then bolting to the two angles together.

I'm exploring the idea that I might screw/bolt the angles up to the frame, rivet the C. to the angles and then carefully cut the C. between them before dropping the C. Your comments/warnings about this idea would be welcome.

Looking back at the history of your project I see the diagram you made that describes the way you did it. https://alliancervowners.com/forum/attachments/1764621330864-png.4252/

I'm interested in this because starting today I have to get to one of my dump valves that failed to open last trip and might as well do it up right.
 

RockDr896

Well-known member
Had I thought of riveting, perhaps that would have been easier.

Install method I used:
--Clamp angle at the frame I-Beam ends
--Make single cut
--Slip 1 angle into cut and attach coroplast
--Trim coroplast back, in order to slip in the 2nd angle piece
--Attach coroplast to it
--Screw angles together in a few places for added strength in the middle

Warning: When drilling rivets, be careful of not drilling the tanks. I was able to keep one end fastened to the frame and drill my holes with room to spare. I kept my angles drilled together, so angle didn't snap when flexing them this way

You may have better luck using my 1st two steps to make your first cut though. Send some pictures when you are done!!
 
Last edited:

George

Prominent Member
Send some pictures when you are done!!
I chickened out and just cut the underbelly at the patch. One day I'd like to segment the whole thing as @RockDr896 has done but I needed a quicker fix this time.
For future reference the "patch" is a general location and to do any work comfortably you need to make it about 3" wider on each side.
I'm ashamed to show my hack job but maybe it'll help others to avoid my mistakes.
I used underbelly tape but cleaned the surface with alcohol first. I hope it holds.
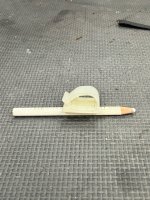
Note to Alliance: I don't think that clip qualifies as securing the cable within 24" of the valve. It did not stick.
 

Attachments

  • clip.jpeg
    clip.jpeg
    812.3 KB · Views: 23
  • excess-wire.jpeg
    excess-wire.jpeg
    2.3 MB · Views: 23
  • hack.jpeg
    hack.jpeg
    975.1 KB · Views: 23

RockDr896

Well-known member
I chickened out and just cut the underbelly at the patch. One day I'd like to segment the whole thing as @RockDr896 has done but I needed a quicker fix this time.
For future reference the "patch" is a general location and to do any work comfortably you need to make it about 3" wider on each side.
I'm ashamed to show my hack job but maybe it'll help others to avoid my mistakes.
I used underbelly tape but cleaned the surface with alcohol first. I hope it holds.
Note to Alliance: I don't think that clip qualifies as securing the cable within 24" of the valve. It did not stick.
Thanks so much for sharing your experience. I only dreamed up the underbelly segmenting, because looking at that patch...was a large leap of faith in it's location. Then adding the size of my hands and fittings......(1st time owner)

You have certainly made me feel better for planning a future repair and making it easier. Alliance has a video, showing a patch repair using zip ties. However, it doesn't address the issue, if you have to cut the hole bigger!!

I did not clean the underbelly surface when I used the tape (Thinking a worst case scenario of being on a gravel pad, 110 degrees, and hating life). The tape failed, when I used the RockDr school of half ass! I do hope your tape holds! Let us know how long it does, having installed it the correct way.
 

RockDr896

Well-known member
1 more thought.......given the strength of the coroplast, you could even patch it with a larger piece of flashing material. That is if the tape does not hold. In addition, I would use a more aggressive screw thread. My patch has the same fine thread screw used all over my trailer...which have been popping out, since I have owned the rig.
 
Last edited:

Lantley

Prominent Member
Here is my method of executing a patch. Remove screws and pull down one side of chloroplast so you can see what your trying to fix.
Valve, sensor or whatever. Once you visually locate the failed gadget. Use a tape measure and measure from the edge to the gadget so that you can cut your hole.
Create a flap to access the gadget only cut 3 sides. Leave the side that faces the front of the trailer attached (do not cut).
Now the portion of the flap that gets the wind as you go down the road is solidly attached.
Once you repair the gadget secure the flap with underbelly tape.
You can also use a few wood stips around the edge of the patch and secure both sides to the wood. Similar to a drywall patch.
Then seal with underbelly tape.
 

RockDr896

Well-known member
Here is my method of executing a patch. Remove screws and pull down one side of chloroplast so you can see what your trying to fix.
Valve, sensor or whatever. Once you visually locate the failed gadget. Use a tape measure and measure from the edge to the gadget so that you can cut your hole.
Create a flap to access the gadget only cut 3 sides. Leave the side that faces the front of the trailer attached (do not cut).
Now the portion of the flap that gets the wind as you go down the road is solidly attached.
Once you repair the gadget secure the flap with underbelly tape.
You can also use a few wood stips around the edge of the patch and secure both sides to the wood. Similar to a drywall patch.
Then seal with underbelly tape.
That works as well. There are so many ways to skin a cat, as they say!! The downside, would be if you have too many patches...you will have created a FrankenCamper...LOL
 

Lantley

Prominent Member
We all know the RV industry gets a lot of things wrong. Chloroplast is one the things the RV industry got right.
It is a very durable light product that comes in large sheets. It is fairly easy to patch , remove or even replace.
While no one likes to pull down the underbelly for fear a what horrors maybe lurking there, Chloroplast makes accessing the underbelly very doable.
Chloroplast also serves as the last line of defense for all the loose wires, loose ducting saw dust, and mess that would otherwise just drag on the ground without chloroplast! :eek: .
Now if well could only get the industry to discover zip ties, vinyl strap and cable clamps we would be set.
 

Ox262

Active member
Great write-ups and gives owners a clue when something gets weird under the RV. And seeing what lies beneath is a perfect example where Alliance can do better. How much money and materials are wasted in that rat's nest of wiring? That mess is just prime for future problems, bad crimps, pinched and chafing wires, and on and on...
 

George

Prominent Member
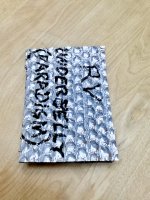
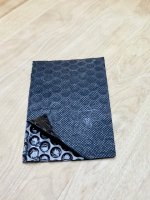
I would like to know the brand name of the underbelly material used on Alliance trailers.
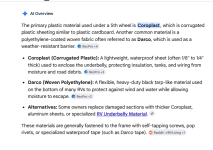
I don't think it's actually Coroplast®. https://www.coroplast.com is a brand name the same as Kleenex is a brand name for facial tissue. Coroplast® is a corrugated plastic similar to cardboard box material. The underbelly cover on our rigs is more of a honeycomb product.
 

Attachments

  • Top.jpeg
    Top.jpeg
    845.2 KB · Views: 6
  • Bottom.jpeg
    Bottom.jpeg
    1.1 MB · Views: 6

RockDr896

Well-known member
I would like to know the brand name of the underbelly material used on Alliance trailers.
I don't think it's actually Coroplast®. https://www.coroplast.com is a brand name the same as Kleenex is a brand name for facial tissue. Coroplast® is a corrugated plastic similar to cardboard box material. The underbelly cover on our rigs is more of a honeycomb product.
It's just me spelling it wrong..LOL
 

Flyer32RLS

Well-known member
The one thing that Forest River did do right on my WildCat 5th wheel was that they installed 4'x8' fiberglass panels on the total underbelly. I would bet that the panels are easier to work with and prpbably as cheap as the Coroplastic that alliance uses. Wish my 32RLS had those panels.
 

Flyer32RLS

Well-known member
OMG George, I know the feeling. I was a pilot for many years and when getting checkrides in the Simulator, I would always say..
"Gear up" or "Gear Down".
Inevitably the instructor would jump on me and say, "the check list says Landing Gear, thats what I want to hear!!"
Like there is anything else on the flight deck that sounds like or rhymes with '"Gear." We all have our difficulties......
Happy Glamping!! :cool:
 
Top