I purchased the OEM Ford trailer camera system for my 24 F350 Lariat with ProTrailer assist (they had 20% off accessories last month). We're waiting for delivery of our 2025 340RL, which I'll install the camera on. I was wondering if anyone has done this on a 340RL (or other Paradigm) and, if so, if they can share their cable routing strategy.
I tested the camera on the truck and the image quality is really very good, if anyone was wondering. Also, the cable kit that comes with the camera has a branch to support the yaw sensor for the ProTrailer assist, which I kind of like (keeps things tidy). Other than the cable routing, the camera is pretty much plug and play.
M and E, well your timing is just about perfect.
I just got done installing a wired trailer camera on our 310 RL. We have a Ram , but mounting and routing know no difference.
I considered the two options, internal and external routing. After removing some of the ceiling lights to see if I could fish it thru the rafters etc, I figured I just didn’t have the time and patience to go this route. So I defaulted to plan B which was external routing. I definitely wasn’t keen on exposed wiring on the back of the coach.
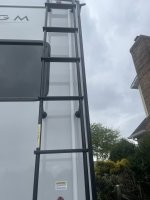
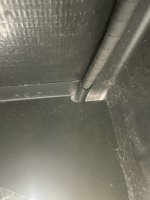
So, I came up with a strategy that used surface mount wiring “races” to hide the exposed wire.
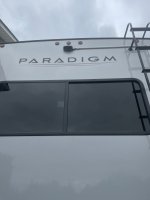
I mounted the camera up near the factory’s pre wire plug(which isn’t needed in my case).
To help hide the race a little and because I had enough cable, I decided to run the raceway to the door side and mount it behind the ladder to help hide it a little. I used exploding rivets sealed with silicone RTV to seal and secure the raceway.
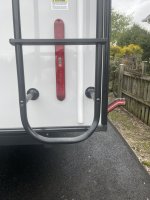
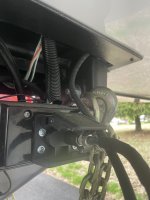
I drilled thru the back wall and hid the hole behind the raceway. At this point, I ran the cable across the back of the rear hitch, securing it with insulated P Clamps. This got me to the off door side, and I used the cut out in the floor support gussets to run the cable thru. I added extra loom at each gusset just to help prevent any chance of rubbing thru.
Where gussets weren’t available, I used the P clamps and short self tapping screws to secure the cable to the frame rail.
This got me to the propane compartment, from there a hole was drilled to get me to the front compartment.
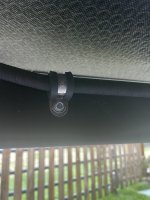
At this point, I mounted the repeater about coach centerline and attached the rear cable.
The next step was to install the cable from the repeater to the truck. I was able to fish this from the front compartment following the existing wiring leading to the pin box for the 7 pin plug and it came out in the pin box area.
I mounted the storage receptacle to the 7 pin cover and again sealed the mounted screws..
The Ram installation instructions recommended, a max height of 6 feet, in hind sight, I am very happy with the the installation, but I think the field of view might be better following those instructions, instead of going higher like I did.
If I had to do it over again, I would go lower, so you might hook it up before beginning your install and get a feel what height would work best for you.
Attached are a few pictures for your reference