Chaseweston
Well-known member
For those of you who have been experiencing the coil freezing up on the subject fridge/freezer - here is the fix.
I'll try and type this with as much information for any experience level to try.
Huge credit to this post in the forest river forum but he left out some info that I had to sort through so I'll detail that here:
Forest River Forum Defrost Circuit Fix Post
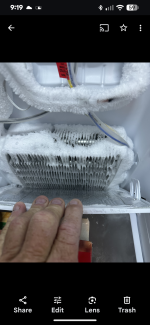
I had been experiencing temp issues in our freezer for a few weeks where the fridge would hold at 36 deg but the freezer would go up to 10 or so and then fall back down, eventually it went up to 19 degrees and would not go below that while the fridge was reading 36. I pulled the back panel of the freezer where the coil is and discovered it completely solid with ice and frost on 10/14/24:

To pull the back panel you must do the following steps:
1. Remove the top freezer tray - just pull up and out.
2. Remove the bottom Freezer bin - it is just sitting within the rails of the drawer guides- pull up and out.
3. Remove the freezer drawer door - pull up and out on the guide rails just like any drawer guide.
4. Remove two phillips head screws on the back panel.
5. Pull on the sides of the back panel near the bottom (at the screw location elevation) - don't pull on the very bottom - the top is held in with tabs and the sides with clips. just pull evenly on both sides (will take some force) and the bottom will kick out a bit
6. Once removed - Unclip temp sensor connector and fan connector on right side.
7. Success - panel removed.
When we first discovered this, we used a hair dryer to quickly defrost the coil and get the freezer running again so we could chug along and not lose our food. This is a temporary fix as the actual issue is the very poorly used molex type connector that the defrost circuit runs through. At first - defrosting it bought us 2 weeks until it started acting up again - defrosted again - and it only lasted a week before temp issues came back.
Enter - The Fix
The actual issue is the unit is not successfully defrosting the coil when it calls for defrost - this is due to the connector the manufacturer (Everchill/Magic Chef/Lippert.. whoever it actually is) used to pass the circuit through the freezer roof - it is a crappy molex-type bulkhead connector that appears to be underrated for the current demand. I'm willing to bet, if you're reading this, your connector looks like mine did and you'll notice, exactly like the one in the forest river forum post:

The defrost circuit is simple - two heating elements run along the bottom of the coil, when the control board calls for defrost, current is applied to the circuit - the resistance in the elements heats the coil and removes any frost.
Due to the faulty connector, the elements either aren't getting enough current, or its actually shorting out in the connector and the control board (hopefully) terminates the defrost cycle. - Note: There are no error codes present leading me to believe the fridge is unaware it is unable to defrost.
The simplest way to fix this is to bypass the factory connector and rerun wires from the control board to the elements with a properly rated connector(s).
I could not unplug my connector because it was so melted together so I cut the wires off just below it.

The Post linked above uses marine 16 AWG wire and 30 A Anderson Powerpole connectors to rerun the circuit - since I had Deutsch connectors and normal 16 AWG wire on hand, I used what I had. The important part is the current rating - The defrost circuit is 120w at 12v - that's 10amps through the connector - the Deutsch DT connector I used is rated for 13 amps so at 10amps, the draw is just under 80% rating - good to go.
I pinned the connector with the new wires on one side, and the existing defrost circuit on the other.
Defrost circuit side:

The next step is running the wires to the control board location. I chose to drill exactly where the guy did in the forest river post just adjacent to the bottom drip tray. you'll need a long drill bit to get all the way through and punch out of the back where you need to land.
new circuit and connector in coil compartment:

Unfortunately I did not take photos in the back of the fridge but I will explain and use a photo of the control board from online.
When looking at the back of the fridge, with the back wire guard removed, the hole we drilled will be in the far back right top corner of the compressor bay - pull your new wires through there and run them behind the compressor over to the control board location on the the far left. You'll need to remove the two screws holding the control board case to the left side of the fridge, then remove the single screw holding the metal cover on it (be careful this cover can easily cut you).
Once in the control board, and with your new wires ran behind the compressor, you must cut the existing two wires coming off the below spade connectors (HTR and GND) - leaving enough "tail" to connect your new wires to. (I cut my circuit just outside of the control box routing so I could fit my Wago connectors - I'd suggest doing the same. Then connect your new wires to the existing coming off the control board with Wago connectors (I used three ways so I could add a status light in the future as mentioned in the forest river post but you can use two ways if you do not wish to have this feature). I marked up the below to demonstrate, the white and blue are existing - The orange boxes are Wago Connectors, and the Red and Black are the new wires coming up through the freezer floor and into my Deutsch DT connector as seen in the above photo. It does not matter which new wire you connect to which existing wire so long as one new wire connects to N4 (GND) and one new wire connects to N2 (HTR).

Lastly, tape up the wire bundle coming out of the control board, fit the cover back on, reattach to side panel, then pump as much silicone as you can into the bottom hole coming into your compressor bay, and the top hole in the freezer floor to seal it up, Put the rear grill guard back on, reinstall freezer panel (Don't forget to connect fan and temp sensors), reinstall freezer drawer and bins, and push fridge back in the hole. Now enjoy that you've fixed your fridge and removed a fire hazard.
I did this fix on 11/10 and it has been working perfectly since.
I'll try and type this with as much information for any experience level to try.
Huge credit to this post in the forest river forum but he left out some info that I had to sort through so I'll detail that here:
Forest River Forum Defrost Circuit Fix Post
I had been experiencing temp issues in our freezer for a few weeks where the fridge would hold at 36 deg but the freezer would go up to 10 or so and then fall back down, eventually it went up to 19 degrees and would not go below that while the fridge was reading 36. I pulled the back panel of the freezer where the coil is and discovered it completely solid with ice and frost on 10/14/24:
To pull the back panel you must do the following steps:
1. Remove the top freezer tray - just pull up and out.
2. Remove the bottom Freezer bin - it is just sitting within the rails of the drawer guides- pull up and out.
3. Remove the freezer drawer door - pull up and out on the guide rails just like any drawer guide.
4. Remove two phillips head screws on the back panel.
5. Pull on the sides of the back panel near the bottom (at the screw location elevation) - don't pull on the very bottom - the top is held in with tabs and the sides with clips. just pull evenly on both sides (will take some force) and the bottom will kick out a bit
6. Once removed - Unclip temp sensor connector and fan connector on right side.
7. Success - panel removed.
When we first discovered this, we used a hair dryer to quickly defrost the coil and get the freezer running again so we could chug along and not lose our food. This is a temporary fix as the actual issue is the very poorly used molex type connector that the defrost circuit runs through. At first - defrosting it bought us 2 weeks until it started acting up again - defrosted again - and it only lasted a week before temp issues came back.
Enter - The Fix
The actual issue is the unit is not successfully defrosting the coil when it calls for defrost - this is due to the connector the manufacturer (Everchill/Magic Chef/Lippert.. whoever it actually is) used to pass the circuit through the freezer roof - it is a crappy molex-type bulkhead connector that appears to be underrated for the current demand. I'm willing to bet, if you're reading this, your connector looks like mine did and you'll notice, exactly like the one in the forest river forum post:
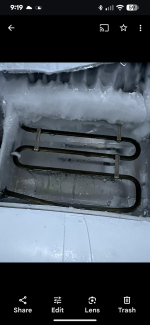
The defrost circuit is simple - two heating elements run along the bottom of the coil, when the control board calls for defrost, current is applied to the circuit - the resistance in the elements heats the coil and removes any frost.
Due to the faulty connector, the elements either aren't getting enough current, or its actually shorting out in the connector and the control board (hopefully) terminates the defrost cycle. - Note: There are no error codes present leading me to believe the fridge is unaware it is unable to defrost.
The simplest way to fix this is to bypass the factory connector and rerun wires from the control board to the elements with a properly rated connector(s).
I could not unplug my connector because it was so melted together so I cut the wires off just below it.
The Post linked above uses marine 16 AWG wire and 30 A Anderson Powerpole connectors to rerun the circuit - since I had Deutsch connectors and normal 16 AWG wire on hand, I used what I had. The important part is the current rating - The defrost circuit is 120w at 12v - that's 10amps through the connector - the Deutsch DT connector I used is rated for 13 amps so at 10amps, the draw is just under 80% rating - good to go.
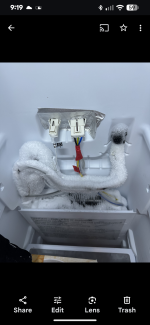
I pinned the connector with the new wires on one side, and the existing defrost circuit on the other.
Defrost circuit side:
The next step is running the wires to the control board location. I chose to drill exactly where the guy did in the forest river post just adjacent to the bottom drip tray. you'll need a long drill bit to get all the way through and punch out of the back where you need to land.
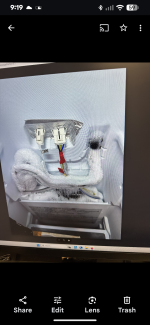
new circuit and connector in coil compartment:
Unfortunately I did not take photos in the back of the fridge but I will explain and use a photo of the control board from online.
When looking at the back of the fridge, with the back wire guard removed, the hole we drilled will be in the far back right top corner of the compressor bay - pull your new wires through there and run them behind the compressor over to the control board location on the the far left. You'll need to remove the two screws holding the control board case to the left side of the fridge, then remove the single screw holding the metal cover on it (be careful this cover can easily cut you).
Once in the control board, and with your new wires ran behind the compressor, you must cut the existing two wires coming off the below spade connectors (HTR and GND) - leaving enough "tail" to connect your new wires to. (I cut my circuit just outside of the control box routing so I could fit my Wago connectors - I'd suggest doing the same. Then connect your new wires to the existing coming off the control board with Wago connectors (I used three ways so I could add a status light in the future as mentioned in the forest river post but you can use two ways if you do not wish to have this feature). I marked up the below to demonstrate, the white and blue are existing - The orange boxes are Wago Connectors, and the Red and Black are the new wires coming up through the freezer floor and into my Deutsch DT connector as seen in the above photo. It does not matter which new wire you connect to which existing wire so long as one new wire connects to N4 (GND) and one new wire connects to N2 (HTR).
Lastly, tape up the wire bundle coming out of the control board, fit the cover back on, reattach to side panel, then pump as much silicone as you can into the bottom hole coming into your compressor bay, and the top hole in the freezer floor to seal it up, Put the rear grill guard back on, reinstall freezer panel (Don't forget to connect fan and temp sensors), reinstall freezer drawer and bins, and push fridge back in the hole. Now enjoy that you've fixed your fridge and removed a fire hazard.
I did this fix on 11/10 and it has been working perfectly since.