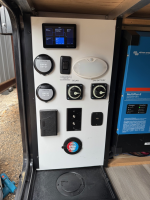
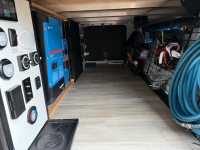
First, I’d like to thank everyone that came before and posted their work online. I got inspiration from many sources so now I will try and pay it forward with my write-up.
The install centers around a Victron Multiplus-II 24/3000 2x120V. The inverter provides power to the entire RV and does not use the inverter prep. New solar panels were installed to reach 1200w.
Design goals:
Power:
Cables:
Notes:
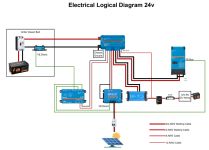
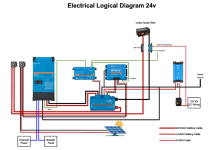
DC Only Diagram
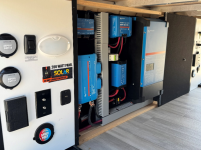
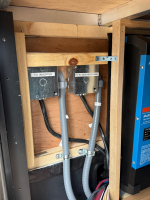
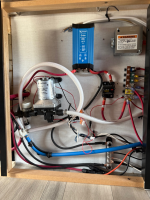
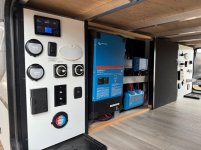
Missing from the picture is the 6/3 Romex run coming in from bottom left, larger cable trays to support the Romex and plastic shield to protect the lower half from external objects.
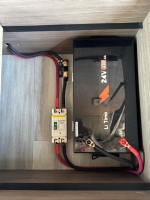
Battery under the queen bed. The photo is missing the VE.Direct Cable from the SmartShunt and foam in the hole.

Solar panel placement, red boxes are the panels, white are existing roof components.
The install centers around a Victron Multiplus-II 24/3000 2x120V. The inverter provides power to the entire RV and does not use the inverter prep. New solar panels were installed to reach 1200w.
Design goals:
- Maximize voltage to reduce amperage requirements
- Fit into the only storage area available on the 321BH without loss of usable space
- Add as much solar while keeping easy roof access
- Look good (to me)
Power:
- 24v LiFePo4 230aH battery. I would have liked a higher voltage system, but going with Victron was a limiting factor. Room for 2 more batteries if needed
- 200w 24v Rich solar panels, removed factory installed 12v panel. 2 serial 3 parallel panels for maximum 87V and 17.8A
- Extended the existing 6/3 Romex to the Multiplus and ran Romex back to the 50A breakers
- Removed factory installed converter and solar controller
- Using a 24v to 12v DC to DC converter to power RV but also installed 12v LiFePo4 battery in battery box as a backup and to provide power when 24v system is off
- Due to having a 12v battery source, I added a diode to prevent back feeding the 24v system
- Wired a 6-24V to 5V Step-Down Regulator from 12v system into Lynx Distributor to power LEDs. Several different ways to do this shown on YouTube
- All ground is common and connected to the chassis
Cables:
- From 24v battery, the Victron requirement is 1/0 AWG. I went with 2/0 AWG Spartan welding cable for extra headroom for slightly more cost
- For all other runs, I also used Spartan welding cable at different AWG as needed. The details are in the logical wiring diagram
- No changes were made to factory cabling. The Orion converter’s 12v output was fed into the same post the factory converter used
Notes:
- I didn’t go with a display for the Cerbo. I’ve found connecting to it over it’s Wi-Fi works for when I need to make adjustments. Might be a future add
- I have room for 2 more solar panels if needed. Going with 250w panels might have fit and given more watts per foot, but the cost jump wasn’t justified for my needs
- Mounted equipment to a plywood board using bolts. All done in a way to be able to remove/service components from the front
- The Victron equipment was bought through amazon, but the vendor I picked was Inverters-R-US. I used their web site during my research so figured I would buy from them; it worked out well
- Must enjoy buying tools. Large and small gauge wire crimpers, solar crimpers, and ferrule crimpers. I learned about solar and ferrule connections after starting the project
- I love designing and building, so this project scratched an itch. It was over 100 hours of research, design, testing and installing all done by myself. Now that I’ve checked this off of things to do, I'm not sure I would do it again.
- Solar Charger https://www.amazon.com/gp/product/B073ZJ43L1
- Lynx Distributor https://www.amazon.com/gp/product/B07FML8JHG
- MultiPlus-II 2x https://www.amazon.com/gp/product/B0B94MRPK4
- SmartShunt https://www.amazon.com/gp/product/B0856PHNLX
- Cerbo https://www.amazon.com/gp/product/B0851KGF57
- Orion DC-DC converter https://www.amazon.com/gp/product/B01BF5BQLA
- Victron MK3-USB Interface https://www.amazon.com/gp/product/B06Y5WS3VZ
- Victron VE.Direct Cable 5.9’ and 2.95’ https://www.amazon.com/gp/product/B01CPWVTS2
- Rich 24V 200W panels https://www.amazon.com/gp/product/B086WYLCRM
- BougeRV 40’ 10AWG solar cable https://www.amazon.com/gp/product/B07BRFPD6R
- BougeRV solar connectors https://www.amazon.com/gp/product/B07875Y7N9
- Solar Y branch connector https://www.amazon.com/gp/product/B0CRR6Y42K
- Spartan welding cable various sizes https://www.amazon.com/gp/product/B08Y7JH5PB
- Wire lugs for various sizes https://www.amazon.com/gp/product/B092ZM5MJD
- Ethernet cable https://www.amazon.com/gp/product/B01BGV2IH4
- Step-Down regulator https://www.amazon.com/dp/B076P4C42B
- Black felt backing https://www.amazon.com/gp/product/B0C7TW4RX1
- Many Home Depot screws, bolts, washers, nuts, Romex, junction box, wire nuts, plywood and I’m sure a lot more

DC Only Diagram

Missing from the picture is the 6/3 Romex run coming in from bottom left, larger cable trays to support the Romex and plastic shield to protect the lower half from external objects.

Battery under the queen bed. The photo is missing the VE.Direct Cable from the SmartShunt and foam in the hole.

Solar panel placement, red boxes are the panels, white are existing roof components.


