• Click here to access some of the presentations made during the 2022 National Rally

310RL Shower Valve Inspection

Meanjean73

Well-known member
Is there a way to see the back side of the shower valve to check for leaks? Wasn’t sure if the towel closet had an inspection cover?

I don’t suspect a leak but I thought it would be a good idea to check now and then.
 
Last edited:

George

Prominent Member
No access panel for shower valve in the pantry on my '24 310RL. Looks like it'd be easy to make one in the back of the pantry should I need to though. Pretty sure it'd be there and not in the bathroom linen cupboard.
 

Meanjean73

Well-known member
No access panel for shower valve in the pantry on my '24 310RL. Looks like it'd be easy to make one in the back of the pantry should I need to though. Pretty sure it'd be there and not in the bathroom linen cupboard.
I just checked my pantry and nothing in mine either. Thanks for the reply
 

Fishfnatic

Well-known member
I’m not at camper now but when I get back tomorrow I will-look more thoroughly. I definitely saw 2 screws and piece of wall panel. Was at Houston rv show tonight and 310 there had panel in pantry with 4 screws and panel
 

RockDr896

Well-known member
Well, you are lucky the access is in the pantry. I would pull out the shelves and make the entire back wall my access panel. If the back wall matches the interior, you can buy some 24" or 12" wide seam tape and make your own panel that matches your interior.

I am a bit of an animal, so this is only the opinion of a "tear it out and fix it all" kind of guy. Just don't let the water issue go unsolved. I encountered a lot of mold because of those lousy RV shower fixtures and the old style shower builds (2023). I put in an all brass residential fixture in mine. No more silicone and cheap twist on water line fittings. The pictures show, what I encountered. Because the water goes to the bottom of the wall, that is where the mold will grow first. This is why I recommend making the entire wall an access panel. I also posted the most amazing mold remover EVER!! No scrubbing and clears the mold in porous materials in 15 min.
 

Attachments

  • 1771021019865.png
    1771021019865.png
    580.9 KB · Views: 25
  • 1771021087994.png
    1771021087994.png
    365.5 KB · Views: 22

Fishfnatic

Well-known member
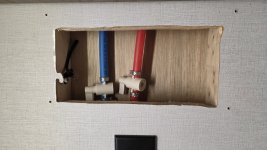
Here is what is in mine. Have not taken out to see what’s behind . But it is waist high behind the shower hookups. I think it might be at base of shower.
 

Attachments

  • image.jpg
    image.jpg
    458.8 KB · Views: 19

mboudoin

Member
Opening contains the valves to the shower section. Around 2ft above that are the elbows to the shower assembly. It does appear you can get to those fitting from behind the shower assembly.
 

Attachments

  • 20260214_083501.jpg
    20260214_083501.jpg
    569.9 KB · Views: 16

Meanjean73

Well-known member
Opening contains the valves to the shower section. Around 2ft above that are the elbows to the shower assembly. It does appear you can get to those fitting from behind the shower assembly.
This is inside you pantry on a 310? Can you tell me a more precise location in the pantry? I don’t see one and may cut one into mine.
 

Meanjean73

Well-known member
Here is what is in mine. Have not taken out to see what’s behind . But it is waist high behind the shower hookups. I think it might be at base of shower.
What year is your rv? I’m going to search again in mine but done see it?
Inside your pantry correct?
 

James/Laura

New member
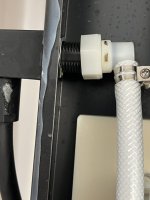
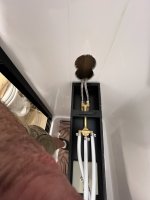
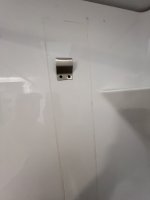
See attached photo for what I found to be the issue with a water leak out the bottom of the shower tower we have in our Paradigm 310RL. Only time it would leak was when the shower wand is used. The nut on the end of the hose was cross threaded and not even finger tight. There are two screws at the bottom of the shower tower holding this unit to the shower wall plus a bracket it hangs from on the inside at the top. Be sure to remove only the screws on the bottom bracket that go into the shower wall and not the hex head type screws going into the metal of the shower tower. These are in the same bracket as the two screws going into the shower wall. There are nuts holding them onto the shower tower that cannot be put back on unless you remove the two screws from the shower wall. The photo of a bracket is for the top bracket the shower tower hangs from. You have to cut the silicone between the shower wall and shower tower all the way around in order to remove the shower tower. You can see the outline of silicone on the wall. Hope this helps.
 

Attachments

  • IMG_9433.jpeg
    IMG_9433.jpeg
    247 KB · Views: 16
  • IMG_9431.jpeg
    IMG_9431.jpeg
    271.1 KB · Views: 16
  • IMG_9432.jpeg
    IMG_9432.jpeg
    366.3 KB · Views: 16

RockDr896

Well-known member
I had to rebuild my shower. IF you have a floor vent on either side of that wall....check the duct work and see if water migrated into it. Mine was totally full, when I got into mine. Luckily, I was able to go into my pass through and fix the issue.
 
Top