• Click here to access some of the presentations made during the 2022 National Rally

310RL dining slide window valances

Creek Jenkins

Well-known member
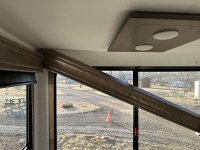
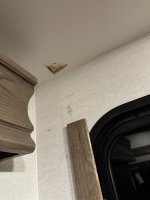
Coming north on our return trip home this month the valance box over the table came loose and swiveled down. Now I have a hole in the ceiling of the slide.

I am repairing the box, when i took it apart I found the 15 or 20 lb box was held up with two small screws. What the helms? There are two holes in each bracket-why are they only using one? Why are there only two brackets?
I am going to add a couple brackets and put screws in all 8 holes. Will do the same for the other side and I will have to check all the windows.
I can’t believe how poorly put together it is. Very disappointing. Not sure how I am going to patch the hole in the ceiling.

Cheers

Creek
 

Attachments

  • IMG_0432.jpeg
    IMG_0432.jpeg
    536 KB · Views: 27
  • IMG_0435.jpeg
    IMG_0435.jpeg
    394.4 KB · Views: 26

RockDr896

Well-known member
Looking at a factory tour video, it looks like you are dealing with a thin piece of wood panel with a skin. I would call Alliance and ask if they have a repair tape for this kind of issue. If they do, you could glue or screw 2 pieces of scrap wood above and then float your repair piece in, like a drywall repair. How to finish it is going to be the interesting problem. Let us know how you do it and include a picture!
 

Creek Jenkins

Well-known member
I have requested replacement paper or fabric from Alliance today, we will see what they have to offer. It crushed the wood in the ceiling, I’m thinking I can fill it with something (wood putty?) smooth it over and hopefully apply whatever Alliance supplies me with. I can’t believe I am the first to have this problem so hopefully they have some material for the repair. I’m sure it will not be perfect all I can hope for is less obvious than the present gaping hole.
Cheers
Creek
 

Creek Jenkins

Well-known member
While you both have some great ideas, I’m not sure they can be described as practical or realistic solutions, more likely they are the product of a fevered and perhaps intoxicated brain. I would avoid that particular brand of mildly poisonous but tasty refreshment from Kentucky. Or Tennessee?

Alliance said they would sell me some matching seam tape. We will see how that works. I’m not optimistic.
 

Creek Jenkins

Well-known member
OK, putting the window boxes back up is not a lot of fun. In order to get them in place we had to remove the two small ones at each end. Which wasn’t too bad because they were also loose and had to come down anyway. I put up four brackets on each box, each bracket has two screws holding it to the wall instead of a single screw.
One thing to note is the L brackets actually go under(over?)the aluminum channel that holds the pull shades. Until we figure that out it was a real struggle.
 

Attachments

  • IMG_0512.jpeg
    IMG_0512.jpeg
    586.2 KB · Views: 21
  • IMG_0511.jpeg
    IMG_0511.jpeg
    660.1 KB · Views: 21

George

Prominent Member
If I had to do this I would consider using those tri-wing exploding rivets for securing the brackets to the wall.
I can't find the post but someone here has already had experience with the "wallpaper" and seam tape. They posted the sizes, part numbers, and cost from Alliance for various widths.
 

Creek Jenkins

Well-known member
Strangely, the small window on the left side of the slider had two screws per bracket. So evidently they put them in sometimes which leads me to believe that they are supposed to have two screws.
All four boxes are secured and reinstalled. Hopefully I never have to deal with them again what a pain.
The wall is surprisingly tough, no need for an insert. I had to predrill the holes just to get the self drilling screws started.
For the 10 millionth time I wish they would use torx head screws. The square drive screws are great for an assembly line but not for repairing.
 

Attachments

  • IMG_0516.jpeg
    IMG_0516.jpeg
    409.5 KB · Views: 18

Creek Jenkins

Well-known member
Also note I just used regular drywall spackling to repair the hole in the ceiling. If you look in the picture, you can still see the pink as it’s not dry yet. After it dried, you really have to look closely to tell the difference. It was also approved by my adult supervisor.
 

M and E

Prominent Member
Strangely, the small window on the left side of the slider had two screws per bracket. So evidently they put them in sometimes which leads me to believe that they are supposed to have two screws.
All four boxes are secured and reinstalled. Hopefully I never have to deal with them again what a pain.
The wall is surprisingly tough, no need for an insert. I had to predrill the holes just to get the self drilling screws started.
For the 10 millionth time I wish they would use torx head screws. The square drive screws are great for an assembly line but not for repairing.
What an absolutely beautiful setting your home sits in!
 

RockDr896

Well-known member
Sounds like a great situation. I am on a lake, but waiting for others to sell their stuff, in order to buy my stuff. I want to downsize soooo bad. Coming from the backpacking world...to eventually end up in the glamping world....I just want 2,800sf....a 5th wheel rig for overflow (Friends & Family).....and a hospital to deal with my eventual medical issues.....just because Insurance actuaries say, that is what it will be...LOL!! I think I may need to build another crib, to get what I want.....
 
Top