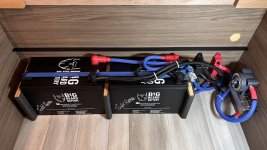
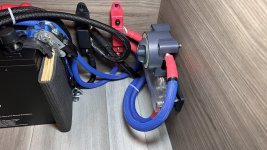
My son and I just completed the installation of some Lithium Iron Phosphate batteries in my 2024 Delta 262RB:
Project
Replace Lead Acid Battery with Lithium Iron Phosphate Batteries (7.68 kWh - initial total)
Objective
To increase our battery capacity and usability (depth of discharge) in order to use our DC using items longer and to create inverted power for AC using items
Products
Big Beard Battery B320 - 320 Ah 12v LiFePO4 Battery x 2 ea - link
Blue Sea Systems 5136 - 400A ANL Fuse - link
Blue Sea Systems 5503 - ANL Fuse Block with Cover - link
Blue Sea Systems 3000- HD Series Switch - link
Bay Marine Red + Black - Pair - 4-Post 250A Bus Bar (I doubled up the bus bar plates in each) - link
SELTERM 4/0 AWG 5/16" Tinned Copper Lugs (I drilled these out larger as needed) - link
SELTERM 2/0 AWG 5/16" Tinned Copper Lugs - link
Temco 4/0 Welding Cable (red + black) - link
Temco 2/0 Welding Cable (red + black) - link
Flexo Neon Blue 5/8" Braided PET Wire Cover (for 4/0 cable) - link
Flexo Neon Blue 1/2" Braided PET Wire Cover (for 2/0 cable) - link
Installation Process
We will recharge our battery bank using the following methods planned for this coach:
A. Solar (1200 watts on the roof).
B. Shore (using the 120A DC charging capability of the Inverter).
C. Truck Alternator (using up to 30A DC charging capability of DC-DC charger).
D. AC Generator (using up to 2500 AC Watts from the generator to the inverter, then the inverter's DC charging).
Experience / Review
We plan to first use the RV in April 2024 and will report back here with our experience.
Pictures
Link to online gallery of all project pictures


Completed Project Video
N/A
Project
Replace Lead Acid Battery with Lithium Iron Phosphate Batteries (7.68 kWh - initial total)
Objective
To increase our battery capacity and usability (depth of discharge) in order to use our DC using items longer and to create inverted power for AC using items
Products
Big Beard Battery B320 - 320 Ah 12v LiFePO4 Battery x 2 ea - link
Blue Sea Systems 5136 - 400A ANL Fuse - link
Blue Sea Systems 5503 - ANL Fuse Block with Cover - link
Blue Sea Systems 3000- HD Series Switch - link
Bay Marine Red + Black - Pair - 4-Post 250A Bus Bar (I doubled up the bus bar plates in each) - link
SELTERM 4/0 AWG 5/16" Tinned Copper Lugs (I drilled these out larger as needed) - link
SELTERM 2/0 AWG 5/16" Tinned Copper Lugs - link
Temco 4/0 Welding Cable (red + black) - link
Temco 2/0 Welding Cable (red + black) - link
Flexo Neon Blue 5/8" Braided PET Wire Cover (for 4/0 cable) - link
Flexo Neon Blue 1/2" Braided PET Wire Cover (for 2/0 cable) - link
Installation Process
- Placed batteries into position under the bed and added padded 3/4" plywood spacers between the batteries (reused from a previous installation)
- Lag bolted hold-downs to floor for ratchet strap.
- Installed ratchet strap with adhesive backed foam rubber for protection at vulnerable points.
- Modified a pair (red + black) bus bars to double up the bus plates in each and installed them to back wall.
- Using 1/4" thick x 1/2” copper bar stock, mounted ANL fuse block to switch and wired to positive bus bar.
- Measured, cut and terminated 2/0 cable, added braided sleeve and heat shrink, then connected batteries in parallel to bus bars.
- Drilled hole in floor (hole saw) and ran 4/0 cable (braided sleeved) to pass-through bay.
- Terminated 4/0 cable and connected positive to switch output and negative to negative bus bar.
- Use foam sealant to seal hole in floor around battery cables.
- Add 2 missing black plastic nuts to bus bar covers.
- Add spacer behind switch.
- Add foam rubber faced 2" aluminum angle to floor on the front long edges of the batteries to hold them up against the back wall.
- Potentially upgrade copper bar stock that connects switch to fuse with a wider (1") piece of copper bar stock.
- Potentially add a 3rd 320 aH battery to existing bank.
- Potentially swapping out current Victron Orion 30A DC-DC Charger for the new Victron 50A XS DC-DC Charger.
- We will use AC and DC using items in the coach (lighting, furnace fan, air conditioning, microwave, TV, communications gear etc.) as we wish, within the limits of the Inverter (about 2400 watts continuous) and the battery bank (7.68 kWh)
We will recharge our battery bank using the following methods planned for this coach:
A. Solar (1200 watts on the roof).
B. Shore (using the 120A DC charging capability of the Inverter).
C. Truck Alternator (using up to 30A DC charging capability of DC-DC charger).
D. AC Generator (using up to 2500 AC Watts from the generator to the inverter, then the inverter's DC charging).
Experience / Review
We plan to first use the RV in April 2024 and will report back here with our experience.
Pictures
Link to online gallery of all project pictures


Completed Project Video
N/A
Last edited:

