

16Cuft Valor Everchill.. 'd2' code.. freezer +on/off together 5 sec to diagnostics check
anyone ran diagnostics..
'H' should show to indicate defrost heater is operative.. other codes are...Ud, UP, F2, F3, F4, F7, F rL, FL, H(defrost test), H1, H2, C, d.
Anyone also dug deeper into this unit ? not sure if defrost circuit working.. as yep had 45 / 16 and the evap coils were iced up.
The Everchill French Door 16.7 Cu Ft RV Refrigerator/Freezer (model BCD-455wte-b-04h 12V) most definitely does have a defrost circuit, although earlier this year (2024), I wondered if it did.
After we'd owned the nifty Everchill French Door model for about 18 months, the defrost circuit broke, causing the compressor and fan to run around the clock, unable to stop the internal temperature from rising. We soon got tired of doing a manual defrost—turning it completely off for two or three days at a time to let the ice buildup in the evaporator coils thaw out and melt into the water pan mounted above the compressor.
Long story short, I was able to fix the defrost problem, and the fridge has been great for several months since.
Because the fridge's control panel lacks a defrost indication, I also mounted a blue 12 V LED light on the wall beside it, which alerts us when the automatic defrost is operating.
I don't recommend you attempt this repair unless you are knowledgeable about such matters or can work with someone who is. You proceed at your own risk, YMMV. Nevertheless, the potential reward is saving the considerable expense of a new fridge because these fridges are not (or should not be) low-quality throw-away items. However, suppose the factory does not start (or has not started) using a much better quality 12 V power connector (some cheap Molex-like part with an insufficient current rating for this application). In that case, I do not doubt that many fridges will be unnecessarily tossed out.
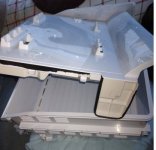
The most challenging aspect of the repair was removing the panel inside the freezer (you'll need to unlatch the drawer and remove it to make room) that covers the evaporator coils and the defrost heater element. It is fixed by two innocent-looking screws, but even after waiting several days to let the ice thaw and let go its icy grip on the panel, I found that the panel was held firmly by two "ears" (see photos). Only by using a robust and sustained force (not so strong that the panel will crack) pulling it outwards towards you will you be able to get it off. I almost gave up several times, but seeing no other way, I tried again using a firmer grip.
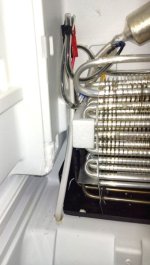
What greeted my eyes was the connector that was supposed to deliver power to the defrost coil connector. It was very burned-looking and useless (see photos). After removing the burned connector, I found the wires poking out of the roof of the freezer were too short to connect the new wiring reliably.
So, after a trip to West Marine, I purchased ten feet of 16 AWG yellow-red marine grade 2-conductor wire and fitted the defrost element wire and the new marine grade wire with 30 A-rated Anderson Powerpole connectors. I carefully drilled a pilot hole through to the compressor bay and used a metal prod by feel if there were any wires I should know about (there were none), enlarged the hole, poked the wire through, and sealed everything with white 100% silicone. I cut off the old defrost wires at the compressor end and used 3-way Wagos to connect the marine wire and a thinner wire for the blue 12-volt lamp.
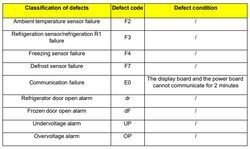
While working in the fridge, I discovered a built-in diagnostic mode, which includes a defrost heater test! It's not an extended test (it only turns on the defrost element for ~1 second while showing "H" in the display, but at least it's there! To enter or exit the diagnostic mode, press and hold the [Freezer] and [ON/OFF] buttons together for 5 seconds. After lighting up all display segments, it steps through a sequence with labels: Ud, UP, F2, F3, F4, F7, F rL, FL, H(defrost test), H1, H2, C, d.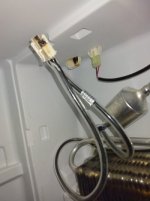
ooooh i thin d2 is door2! as i had right side door open and did not press in close switch before running diagnostics.. will update afetr i run it again
anyone ran diagnostics..
'H' should show to indicate defrost heater is operative.. other codes are...Ud, UP, F2, F3, F4, F7, F rL, FL, H(defrost test), H1, H2, C, d.
Anyone also dug deeper into this unit ? not sure if defrost circuit working.. as yep had 45 / 16 and the evap coils were iced up.
The Everchill French Door 16.7 Cu Ft RV Refrigerator/Freezer (model BCD-455wte-b-04h 12V) most definitely does have a defrost circuit, although earlier this year (2024), I wondered if it did.
After we'd owned the nifty Everchill French Door model for about 18 months, the defrost circuit broke, causing the compressor and fan to run around the clock, unable to stop the internal temperature from rising. We soon got tired of doing a manual defrost—turning it completely off for two or three days at a time to let the ice buildup in the evaporator coils thaw out and melt into the water pan mounted above the compressor.
Long story short, I was able to fix the defrost problem, and the fridge has been great for several months since.
Because the fridge's control panel lacks a defrost indication, I also mounted a blue 12 V LED light on the wall beside it, which alerts us when the automatic defrost is operating.
I don't recommend you attempt this repair unless you are knowledgeable about such matters or can work with someone who is. You proceed at your own risk, YMMV. Nevertheless, the potential reward is saving the considerable expense of a new fridge because these fridges are not (or should not be) low-quality throw-away items. However, suppose the factory does not start (or has not started) using a much better quality 12 V power connector (some cheap Molex-like part with an insufficient current rating for this application). In that case, I do not doubt that many fridges will be unnecessarily tossed out.
The most challenging aspect of the repair was removing the panel inside the freezer (you'll need to unlatch the drawer and remove it to make room) that covers the evaporator coils and the defrost heater element. It is fixed by two innocent-looking screws, but even after waiting several days to let the ice thaw and let go its icy grip on the panel, I found that the panel was held firmly by two "ears" (see photos). Only by using a robust and sustained force (not so strong that the panel will crack) pulling it outwards towards you will you be able to get it off. I almost gave up several times, but seeing no other way, I tried again using a firmer grip.
What greeted my eyes was the connector that was supposed to deliver power to the defrost coil connector. It was very burned-looking and useless (see photos). After removing the burned connector, I found the wires poking out of the roof of the freezer were too short to connect the new wiring reliably.
So, after a trip to West Marine, I purchased ten feet of 16 AWG yellow-red marine grade 2-conductor wire and fitted the defrost element wire and the new marine grade wire with 30 A-rated Anderson Powerpole connectors. I carefully drilled a pilot hole through to the compressor bay and used a metal prod by feel if there were any wires I should know about (there were none), enlarged the hole, poked the wire through, and sealed everything with white 100% silicone. I cut off the old defrost wires at the compressor end and used 3-way Wagos to connect the marine wire and a thinner wire for the blue 12-volt lamp.
While working in the fridge, I discovered a built-in diagnostic mode, which includes a defrost heater test! It's not an extended test (it only turns on the defrost element for ~1 second while showing "H" in the display, but at least it's there! To enter or exit the diagnostic mode, press and hold the [Freezer] and [ON/OFF] buttons together for 5 seconds. After lighting up all display segments, it steps through a sequence with labels: Ud, UP, F2, F3, F4, F7, F rL, FL, H(defrost test), H1, H2, C, d.
ooooh i thin d2 is door2! as i had right side door open and did not press in close switch before running diagnostics.. will update afetr i run it again
Attachments
Last edited: