• Click here to access some of the presentations made during the 2022 National Rally

Paradigm 340RL - Wiring Chase to Control Panel

Jim Beletti

Owner Experience Liaison
Staff member
This post describes what worked for me in my 2022 Paradigm 340RL but it may also be relevant to other Paradigm floor plans or other Alliance brands...

I have some modification plans (Drainmaster electric gate valves, SeeLevel tank monitoring, Communications gear, Video Surveillance gear etc.) down the road and many of them require wiring (AC, DC, Ethernet, Coax, etc.) to be run. Some of that wiring needs to terminate in the area of the coffee bar / buffet cabinet of my 340RL. This will require me to determine a wiring path - one from below and one from above.

Lucky for me, the location of the coffee bar / buffet cabinet is central to my needs. Also lucky for me, I've got quite a bit of wire running experience from a previous career. And finally - the 340RL made it so easy.

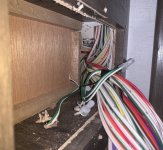
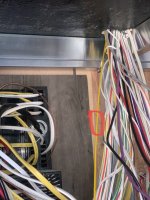
Behind the utility wall (back "behind" the Breaker/Fuse panel), there is a large wire bundle (AC and DC) that goes up into the basement ceiling. This is the primary wire chase to the Control Panel on the end of the Coffee Bar / Buffet upper cabinet.

Steps I took:
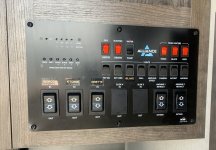
  1. I removed the control panel from the end of the cabinet (6 #2 square drive screws) and carefully pulled the panel out, taking great care with the wiring and connections. I did not disconnect anything.

  2. Using 2 sections of fiberglass wire fish rods connected together, I carefully pushed the male end of the rod up alongside the wire bundle in the utility area. I had to probe around a bit with it before it easily slid up the wall. I continued pushing the rod up the wall until I had about 5 feet of it in.

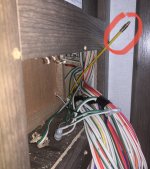
  3. Back inside, I reached my hand through the hole where the control panel had been installed, then into the hole in the wall where the large wire bundle was. I felt around for and found the rod. I had to pull some of the rod back down until just the tip of the rod was visible to me, then I pulled the rod out of the wall and out the control panel hole.

  4. My next step will be to pull back 3 separate pieces of 3/8" yellow poly rope. Later on, these rope sections, one at a time will be used as pull-ropes to pull in wire bundles for new projects. Any rope sections not used will remain in place - just in case they may be needed down the road.
IMG_8170.jpg IMG_8182.jpg IMG_8187 2.jpg IMG_8186.jpg
 

nfd0800

New member
If your 340RL layout is similar to my 310RL, that wire pathway is visible from the bathroom, under the sink. Remove the corner panel and there they are. It is a nice mid-path access. I also used the cabinet above the coffee bar for my "technology area" with my WiFi Ranger, an AT&T home phone & Internet box, a networked hard drive and my Winegard Trav'ler control box. That wire pathway has been very handy
 

Jim Beletti

Owner Experience Liaison
Staff member
If your 340RL layout is similar to my 310RL, that wire pathway is visible from the bathroom, under the sink. Remove the corner panel and there they are. It is a nice mid-path access. I also used the cabinet above the coffee bar for my "technology area" with my WiFi Ranger, an AT&T home phone & Internet box, a networked hard drive and my Winegard Trav'ler control box. That wire pathway has been very handy

Thanks for the tip. I too plan to use the top shelf of the upper cabinet as my communications closet. My plan includes active ventilation of the space using room air to scrub heat off the gear and pass it back into the room.
 
You bet. So far, I've had to reposition the power panel under the coffee bar drawers because it was offset and not closing properly, and re-secure the piece that holds the drawers from tipping forward. Its a rats nest back there! I'll be running wires for additional rear lighting and turn signal strips I'm installing on both sides midway on the rig. SO tired of people acting surprised when I'm taking wide turns...maybe they'll pay attention to a chasing led strip of light in their faces!
 

Famtraveler24

Active member
Sounds awesome. Soon, I'll be rerouting my shore power 6/3 flex Romex to and from my new Victron Quattro (through a manual transfer switch). This wire currently runs from the exterior plug behind the midbunk drawers and to the AC/DC distribution panel. I'll be pulling it from the panel, splicing in a new strand and running it to the inverter. Then, I'll run a new line back from the inverter to the panel. To run the line from the panel to the inverter, I'm going to have to drill a hole down into the underbelly under the midbunk amd fish the wire through the drop frame to the basement wall. This is where the pain begins because the Coroplast is fastened by nails, not screws. So I'm going to have to remove a section of the Coroplast by removing one nail at a time, then when finished, refastening with self-tapping screws.
 

Hotrodjohn

Well-known member
I have done a few mods here as well. The first was the stupid hall light in that panel for the hallway on the other side of the 340. Ran wire Thu that and into basement and into lav cabinet then up inside the wall. I also added a ton of dimmers. That panel is a mess of wires for sure
 

Hotrodjohn

Well-known member
Sounds awesome. Soon, I'll be rerouting my shore power 6/3 flex Romex to and from my new Victron Quattro (through a manual transfer switch). This wire currently runs from the exterior plug behind the midbunk drawers and to the AC/DC distribution panel. I'll be pulling it from the panel, splicing in a new strand and running it to the inverter. Then, I'll run a new line back from the inverter to the panel. To run the line from the panel to the inverter, I'm going to have to drill a hole down into the underbelly under the midbunk amd fish the wire through the drop frame to the basement wall. This is where the pain begins because the Coroplast is fastened by nails, not screws. So I'm going to have to remove a section of the Coroplast by removing one nail at a time, then when finished, refastening with self-tapping screws.
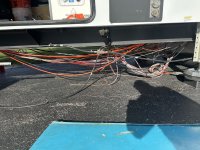
I found the nail removal easy. Spin it with an impact driver to loosen and pound a cats paw in and pry. It really was a lot easier than I thought it would be. Beware the wires and hoses after they are all out.
IMG_3488.jpeg
 

RockDr896

Well-known member
The nail replacement was indeed very easy on my 370FB. My next project is to reduce my underbelly into removable panels. When I was replacing the nails, I saw the same mess you have taken a picture of. I bought a mechanics creeper...LOL. Looks like I will be spending some time under there tying things up and off the under belly. I would love a picture of how you decided to organize the mess if anything can really be better organized. I have attached my plan of attack in how I am going to make the under belly into panels.
 

Attachments

  • 1713021116595.png
    1713021116595.png
    57.5 KB · Views: 13

Hotrodjohn

Well-known member
I went and bought heavy duty zip ties. 36” and 24”. Screwed 1/2” conduit straps to the steel under the floor and “hung” large loops of wires and hydraulic lines as well as some water hoses. Some loops got tucked up to the floor while others had a loop of wire ties hanging 12” or so. I bought the really heavy duty ties
 

RockDr896

Well-known member
I went and bought heavy duty zip ties. 36” and 24”. Screwed 1/2” conduit straps to the steel under the floor and “hung” large loops of wires and hydraulic lines as well as some water hoses. Some loops got tucked up to the floor while others had a loop of wire ties hanging 12” or so. I bought the really heavy duty ties
I have prepared in the same way (heavy duty zip ties), so it is good to here your approach. Thanks for you experience, in the belly of the beast...LOL!!
 
Top